[MZ][Visustella Item&Equip Core] 编辑商店状态窗口

大家好!我是第一次发帖,之前一直是潜水党(如果算上旧论坛的话)。

我一直在使用 Visustella 的核心插件,非常喜欢它们,但商店和装备商店部分给我的麻烦比其他任何插件都多。所以以下是我遇到的一些问题要点:

- 我有 4 个额外的自定义参数。只有使用“比较”数据样式时,它们才会显示。

- 这很酷!对吧?但现在的问题是,它只显示当前战斗成员。但这没什么用,因为我最终会有许多可玩角色。

- 理想情况下,我希望它只显示可玩角色/队伍成员(无论他们是否在战斗队伍中),并且这些角色必须能够使用所选的武器类型,同时将显示的最大角色数量扩展到 5 或 6 人
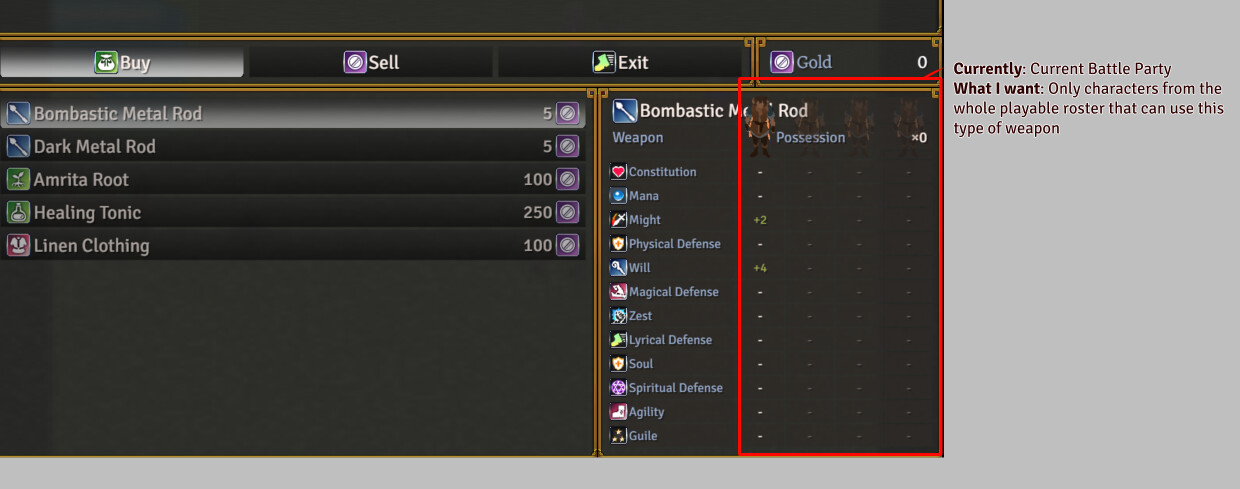
我猜测这与 “actor.canEquip(this._item)” 有关,但我对此完全一头雾水!

以下是 JS 中未编辑的代码:绘制装备数据

// 设置变量

const lineHeight = this.lineHeight();

const paramheight = this.gaugeLineHeight() + 8;

let x = 0;

let y = 0;

let width = this.innerWidth;

let height = this.innerHeight;

let hw = Math.floor(width / 2);

let hx = x + width - hw;

// 绘制物品名称、类型和数量

this.drawItemName(this._item, x + this.itemPadding(), y, width - this.itemPadding() * 2);

this.drawItemDarkRect(x, y, width);

y += lineHeight;

if (this.drawItemEquipType(x, y, hw)) y += 0;

if (this.drawItemQuantity(hx, y, hw)) y += lineHeight;

// 绘制参数名称

const params = this.actorParams();

const backY = y;

y = height - (params.length * paramheight) - 4;

let paramX = x;

let paramWidth = 0;

let tableY = y;

for (const paramId of params) {

paramWidth = Math.max(this.drawParamName(paramId, x + 4, y + 4, width), paramWidth);

y += paramheight;

}

// 绘制角色数据

const actorMax = $gameParty.maxBattleMembers();

const actorWidth = Math.floor((width - paramWidth) / actorMax);

paramWidth = width - (actorWidth * actorMax);

for (const actor of $gameParty.battleMembers()) {

const index = $gameParty.battleMembers().indexOf(actor);

const actorX = paramX + paramWidth + (index * actorWidth);

this.changePaintOpacity(actor.canEquip(this._item));

this.drawActorCharacter(actor, actorX + (actorWidth / 2), tableY);

let actorY = tableY;

// 绘制参数变化

for (const paramId of params) {

const diffY = actorY - ((lineHeight - paramheight) / 2);

this.drawActorParamDifference(actor, paramId, actorX, diffY, actorWidth);

actorY += paramheight;

}

}

// 绘制背景矩形

this.drawItemDarkRect(paramX, backY, paramWidth, tableY - backY);

for (let i = 0; i < actorMax; i++) {

const actorX = paramX + paramWidth + (i * actorWidth);

this.drawItemDarkRect(actorX, backY, actorWidth, tableY - backY);

}

for (const paramId of params) {

this.drawItemDarkRect(paramX, tableY, paramWidth, paramheight);

for (let i = 0; i < actorMax; i++) {

const actorX = paramX + paramWidth + (i * actorWidth);

this.drawItemDarkRect(actorX, tableY, actorWidth, paramheight);

}

tableY += paramheight;

}

如果有人能提供建议或相关知识,我将不胜感激!非常感谢您的时间。

canEquip 似乎是正确的检查方式,问题在于上方的循环只传入了战斗成员。// 绘制角色数据 下方的代码块从 $gameParty.battleMembers() 获取数据,并根据 maxBattleMembers() 设置列宽,因此需要替换的就是这部分。其下方的代码都读取 actorMax,所以如果你预先构建好列表,其余代码应该能正常运行。

尝试用以下内容替换该部分的前四行:

// 绘制角色数据
const actorList = $gameParty.allMembers().filter(actor => actor.canEquip(this._item)).slice(0, 6);
const actorMax = Math.max(actorList.length, 1);
const actorWidth = Math.floor((width - paramWidth) / actorMax);
paramWidth = width - (actorWidth * actorMax);
for (const actor of actorList) {
    const index = actorList.indexOf(actor);

this.changePaintOpacity 开始往下的部分保持你原来的写法不变。slice 中的 6 是列数上限,而 Math.max 则确保在没有人能使用武器时不会除以零。

allMembers() 包含整个队伍,包括后备成员。如果你指的是那些尚未加入队伍的演员,那么列表应从 $dataActors 获取,所以请告诉我你想要的是哪一种,我可以为你写出相应的版本。

有一点需要注意,在该窗口中显示六列意味着每列的宽度大约是四列时宽度的三分之一,因此参数数值和行走的人物图像可能会开始拥挤。如果发生这种情况,你可以将上限降至 5,或者缩小同一脚本中的字体大小,因为这只会影响此窗口。

完全成功了!非常感谢,Baz!

在你写的代码基础上,我添加了 const actorX = paramX + paramWidth + (index * actorWidth);

因为游戏之前报错说 ActorX 未定义,但加上这行后一切就完美运行了 :partying_face:

现在我遇到了另一个问题。我不确定是否应该在这里继续发帖,还是应该开一个新的帖子。如果是后者,我会编辑并删除这段内容。

-出于某些原因,我不想用角色的行走立绘来表示队伍成员,而且我也想要一个更小的图标。所以我在角色的昵称上添加了一个图标,

并将 this.drawActorCharacter 替换为 this.drawActorNickname,效果勉强能用!但是,相比于之前行走立绘完美居中的样子,现在的显示位置有些偏移…

我推测可以通过调整 //绘制角色数据 部分末尾的代码来实现,但我不确定这是否可行。

为了方便参考,这是目前的代码样子。再次感谢你之前的帮助,如果方便的话,希望你能再次指点我正确的方向。

// 设置变量

const lineHeight = this.lineHeight();

const paramheight = this.gaugeLineHeight() + 8;

let x = 0;

let y = 0;

let width = this.innerWidth;

let height = this.innerHeight;

let hw = Math.floor(width / 2);

let hx = x + width - hw;


// 绘制物品名称、类型和数量

this.drawItemName(this._item, x + this.itemPadding(), y, width - this.itemPadding() * 2);

this.drawItemDarkRect(x, y, width);

y += lineHeight;

if (this.drawItemEquipType(x, y, hw)) y += 0;

if (this.drawItemQuantity(hx, y, hw)) y += lineHeight;


// 绘制参数名称

const params = this.actorParams();

const backY = y;

y = height - (params.length * paramheight) - 4;

let paramX = x;

let paramWidth = 0;

let tableY = y;

for (const paramId of params) {

paramWidth = Math.max(this.drawParamName(paramId, x + 4, y + 4, width), paramWidth);

y += paramheight;

}


// 绘制角色数据

const actorList = $gameParty.allMembers().filter(actor => actor.canEquip(this._item)).slice(0, 6);

const actorMax = Math.max(actorList.length, 1);

const actorWidth = Math.floor((width - paramWidth) / actorMax);

paramWidth = width - (actorWidth * actorMax);

for (const actor of actorList) {

const index = actorList.indexOf(actor);

const actorX = paramX + paramWidth + (index * actorWidth);

this.changePaintOpacity(actor.canEquip(this._item));


this.drawActorNickname(actor, actorX + (actorWidth / 2), tableY);

let actorY = tableY;


// 绘制参数变化

for (const paramId of params) {

const diffY = actorY - ((lineHeight - paramheight) / 2);

this.drawActorParamDifference(actor, paramId, actorX, diffY, actorWidth);

actorY += paramheight;

}

}


// 绘制背景矩形

this.drawItemDarkRect(paramX, backY, paramWidth, tableY - backY);

for (let i = 0; i < actorMax; i++) {

const actorX = paramX + paramWidth + (i * actorWidth);

this.drawItemDarkRect(actorX, backY, actorWidth, tableY - backY);

}

for (const paramId of params) {

this.drawItemDarkRect(paramX, tableY, paramWidth, paramheight);

for (let i = 0; i < actorMax; i++) {

const actorX = paramX + paramWidth + (i * actorWidth);

this.drawItemDarkRect(actorX, tableY, actorWidth, paramheight);

}

tableY += paramheight;

}

同一个线程没问题,因为它们是同一个窗口和同一段代码块,这样以后任何人查找时都能保持上下文完整。

是的,你注意到 actorX 那一行确实是个好点子,那部分确实应该在那里。

出现偏移是因为这两个绘制函数对 x 的处理方式不同。drawActorCharacter 会传递给 drawCharacter,后者会将精灵在传入的 x 坐标处居中,所以 actorX + (actorWidth / 2) 会恰好落在正中间。而 drawActorNickname 是文本绘制,x 代表文本框的左边缘,且你没有传递的 width 参数会回退到一个比你的列宽更大的默认值。

最简单的版本,位于列的左边缘:

this.drawActorNickname(actor, actorX, tableY, actorWidth);

要真正将其居中,由于 drawActorNickname 没有对齐参数,我可能会先测量文本宽度并自行进行偏移:

const nick = actor.nickname();
const nickWidth = this.textSizeEx(nick).width;
this.drawTextEx(nick, actorX + ((actorWidth - nickWidth) / 2), tableY, actorWidth);

drawTextEx 也会处理文本代码,因此如果昵称字段中包含来自 \I[x] 的图标,它应该仍然会正常绘制。

垂直方向上两者也有所不同。drawCharacter 将精灵的底部放置在你提供的 y 坐标处,而文本绘制是从 y 向下进行的,因此图标的位置会比精灵更低。对 tableY 值做一个小幅度的负向调整应该能让它们重新对齐,我通常会通过目测与参数行进行对比来调整。

非常感谢!第二段代码完美解决了问题。

在应用你的代码后,我保留了 let actorY = tableY; 这一行。对于 tableY 值的负向偏移,应该应用在你代码的最后一行,还是我提到的另一处?具体应该如何格式化呢?

再次感谢。还有一件事,说完我就放你走。我只是想把 “Owned” 旁边的 “x0” 向左移动一点,以免碍事。在这个 “Draw Equip Data” 代码中有办法实现吗?我一直在尝试调整,但可惜没能成功。

请将 nudge 仅应用于 drawTextEx 那一行,不要应用于 let actorY = tableY;。后者是下方参数行的起始点,因此如果移动它,所有值都会随之向下偏移。

所以它应该放在调用的 y 参数中:

this.drawTextEx(nick, actorX + ((actorWidth - nickWidth) / 2), tableY - 6, actorWidth);

这里的 6 只是一个初步猜测,请调整该数值,直到图标位于你希望的位置。

对于 ×0,这个脚本只让你处理这一行中的 x 和 width:

if (this.drawItemQuantity(hx, y, hw)) y += lineHeight;

如果该数字在传入的宽度内右对齐,缩小宽度会将其向左拉,同时保持“已拥有”(Owned)标签位置不变。尝试使用 hw - 40 看看是否有变化。如果完全没有移动,则说明位置来自插件内部,而不是由你传入的值决定的,那么通过此代码框无法修改它。这只是一个测试方法,而非确切答案,我不确定 VisuStella 具体是如何绘制它的。

一切运行完美!

表格Y上的-43和硬件上的-60解决了问题。

Baz,非常感谢你的帮助。不仅因为你给了我答案,还因为你解释了一切!:star_struck:

不客气!