Tutorial: Script Course #5 Let's Create Scene Transitions.

In this course, you will learn the basics of script creation in ACTION GAME MAKER.
In the fifth session, we will create scene transitions.

Preparation Before Starting the Course

Continue using the project from Sessions 1 to 4.
Please open the project and get ready.

STEP 1: Create the Title Screen and Try Moving Using Scene Transitions

  1. Open a new Scene tab and create a game scene. Once created, save it with the name “title”.

  2. As a child of the UI node, add a ColorRect node.

  3. Expand the ColorRect so that it covers the menu display area.

  4. Since white is too bright, set the Color property to black.

  5. As a child of the UI node, add a Label node. This is a node for drawing text.

  6. Enter “SAMPLE GAME PROJECT PRESS A START” in the Text field of the properties.

  7. Next, create a new LabelSettings and set the font size to 80.

  8. Set the horizontal alignment to center and adjust the Label’s position so it is roughly in the middle.

  9. Although it is very simple, the title scene is now complete. Change to Scene Transition in the top tab.

  10. Place the title.tscn created earlier to the left of game_scene, and link from title to game_scene just like with VisualScript.

  11. Set the transition condition (Switching Conditions) to trigger when the A button is pressed.

  12. For the transition effect, set both Before Transition and After Transition to BLACK.

  13. Right-click on Title and set it as the Start Scene.

  14. Try running a test play. If configured correctly, the title scene should appear, and pressing the A button or the Z key should transition to the game scene.

About Test Play When Multiple Scenes Exist

By pressing the :clapper_board: icon near the Test Play button or the F6 key while a specific scene is open, you can run the current scene.
image
However, in this state, scene transitions may not work correctly. Therefore, if you want to test including scene transitions, we recommend setting the scene you wish to test as the Start Scene in the Scene Transition tab.

STEP2: Let’s try moving between scenes using a portal.

  1. Switch to the game_scene tab. Create a Portal as a child of BaseLayer.

  2. Configure the portal properties. Set it to trigger when entering from the right. Leave the destination scene path blank for now and proceed.

  3. Set both the entrance effect type and exit effect type to BLACK.

  4. Add 2 to the CollisionMask. This is necessary because the sample player’s layer is set to 2, so a mask of 1 alone won’t detect collisions.

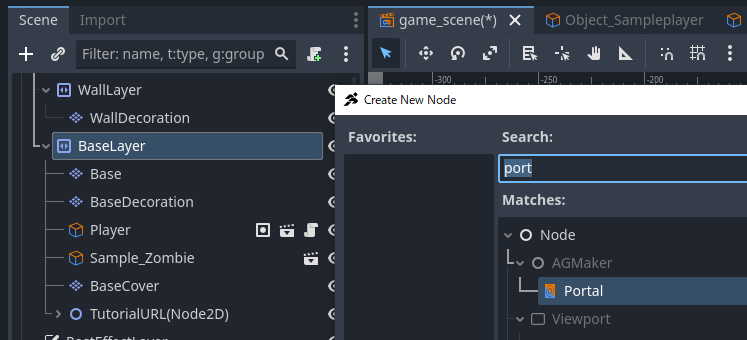
  5. Move the Portal’s coordinates to the right edge of the stage. At this time, please move the Portal node itself, not the PortalCollision. The position of the Portal node will be the destination.

  6. The PortalCollision is too large, so let’s reduce its width. If it’s too big, collisions might trigger unexpectedly.

  7. Next, create the destination scene. In the file system, duplicate game_scene.tscn to create game_scene2.tscn.

  8. Open game_scene2 and delete the player. If not deleted, the player will split into two.

  9. Move the Portal node to the left edge of the map.

  10. Correct the position of PortalCollision. After moving through the portal, the size of the portal collision was changed, so it should be misaligned. In this image, the collision is on the right side of the Portal node, so move it to the left side.

  11. Change the portal properties. Change the input condition from right to left, and set game_scene.tscn as the target scene. Then, you can select the portal in game_scene; select it.

  12. Return to the game_scene tab. Similarly, set game_scene2.tscn in the scene path and select the portal.

  13. Let’s test play. If configured correctly, you should be able to freely move between the two scenes.

Conclusion

That concludes the content of the Script Course tutorial.
The content explained in the tutorial is only basic.
In ACTION GAME MAKER’s visual scripting, various movements can be created by combining conditions and actions.
Depending on your creativity, someone might create something our development team never imagined.
If you come up with ideas, please share them on SNS or in the guild.

If you want to take other courses, check here

1. Graphics Course
This course is for those who want to animate characters they have drawn.

3. Expression Enhancement Course
This course is for those who want to add cool, Godot-style expressions.