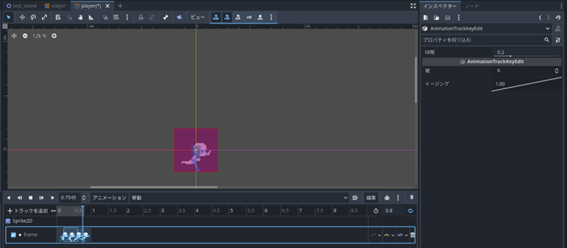
Let’s Create an Animation with the AnimationPlayer Node
In Godot Engine/ACTION GAME MAKER, animations are created using a node called AnimationPlayer. This animation uses a timeline-based creation method, similar to video editing. Events called “keyframes” are placed on lines called “tracks,” such as for images and sounds, and the keyframes on each track are executed as time progresses.
For example, a timeline-based animation is like an orchestra’s musical score. At the start of the performance or at the 1-second mark, the piano plays a “C note,” and the violin plays a “D note.” In this case, the tracks represent “types of instruments,” and the keyframes represent “instructions on how to play.”
Let’s Create an Animation.
The animations needed this time are three types: “Idle” when no input is given, “Jump” when the jump button is pressed, and “Move” when left or right input is detected. Let’s create these three animations using AnimationPlayer.
-
Select the AnimationPlayer in the Scene window.
-
A new window named Animation appears in the center bottom, like a tile.
-
Press the Animation button and select New.
-
A window named New Animation Name will appear. First, let’s create “Idle.” Enter “Idle” and press the OK button.

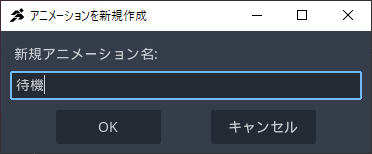
- The Idle animation has been created. By inserting the “frames” of the image registered earlier into this, we can create an animation.

- Please select the Sprite2D node. Among the 9 types of images, the frame for Idle is only the one at the top-left corner. Since the frame of the top-left image is 0, the setting should be to display frame 0 in the “Idle” animation.

- Confirm in the Inspector that Animation > Frame is set to 0, then click the mark labeled “
 +”. This is the Insert Keyframe button, which has the function of registering the current frame in the displayed animation.
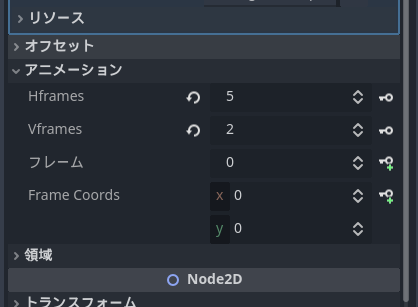
- A window like the one below will appear. Turn off “Create RESET track” and press the Create button.

Note: What is the RESET track?
It is used to specify the initial state of the scene. While it could be specified as the initial state for “Idle,” it is generally not used in ACTION GAME MAKER, so keep it turned off.
- A track named Sprite2D.frame has been created in the animation. Since frame 0 of player.png is set at the 0-second mark, this image will be displayed instantly when the “Idle” animation starts. Since “Idle” consists of a single image, it is now complete. Next, let’s create “Jump.”

- Repeat steps 1–8 to create “Jump” similarly. Note that the frame for “Jump” is the third one from the left in the top row, which is frame “2.” If set correctly, the display should look like the following:

- Finally, let’s create “Move.” However, since the frames for “Move” range from the first to the fourth from the left in the bottom row (frames 5, 6, 7, and 8), there are slightly more settings compared to “Idle” or “Jump.”
Switching these four frames sequentially every 0.2 seconds and looping them should result in a smooth motion.
- First, repeat steps 1–8 as with “Idle” and “Jump” to create “Move.” Specify and set frame “5.” If set correctly, the display should look like the following:
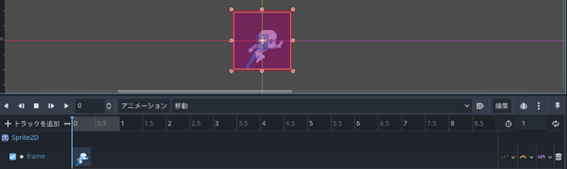
- Next, set frame 6 to occur 0.2 seconds after frame 5. Enter “0.2” in the box labeled “0” next to the animation. This sets the position of the playback bar, moving it to the 0.2-second mark.

- Switch the Sprite2D frame to “6” and insert a keyframe using the + button. If set correctly, frame 6 will be inserted at the 0.2-second mark as shown below:
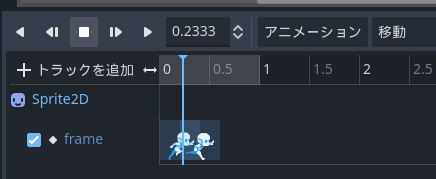
- Repeat steps 13–14 to insert frame “7” at the 0.4-second mark and frame “8” at the 0.6-second mark. All four frames should now be set.
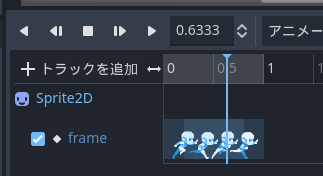
- Next, change the length of the animation. The “1” next to the clock icon in the top-right corner indicates the animation length, showing that the current Move animation is 1 second long. Since this animation switches between 4 sprites every 0.2 seconds, a length of 0.8 seconds should allow for a clean loop. Change the number to “0.8.”

- Finally, enable looping for the animation. The repeat icon next to the time duration is the Loop button. Click it to enable looping.
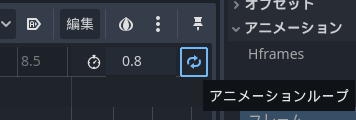
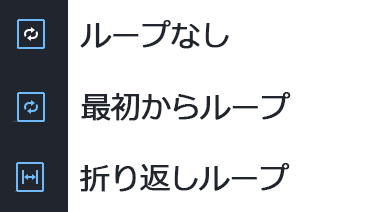
Note: Loop and Ping-Pong Loop from the Start
The setting configured in these steps is a “loop” where the animation automatically restarts from the beginning once it reaches the end. By clicking again, you can also set a “ping-pong loop,” where the animation reverses and plays backward once it reaches the end.
- Once all settings are complete, check if the animation plays correctly using the Play Animation button. If it moves smoothly, it is OK.

If the animation does not play smoothly:
When selecting an image on the track, the “Value” field displays the frame number of that image. Select them in order and confirm that they are arranged as 5, 6, 7, 8. If incorrect, you can change the frame of the image by modifying the “Value” number.
Also, verify that the loop playback is set correctly and that the animation length is properly set to 0.8 seconds.