Tutorial: Script Course #2 Let's Create an Enemy.

In this course, you will learn the basics of script creation in ACTION GAME MAKER.
In the second session, we will create enemies.

Prerequisites to Start the Course

Continue using the project from the first session.
Please open the project and prepare accordingly.

STEP 1: Set Up the Basic Configuration for the Enemy (Zombie).

  1. Use the zombie template object for the enemy. Open a new tab, select Game Object, and create it with the following settings:
    Name: Any, here we will use Sample_Zombie.
    Template: characters
    Type: Enemy_Zombie
    Group: Enemy
    After creation, save it using Ctrl+S.

  2. Configure the basic settings. Open BaseSettings and set the following:
    Enable Auto H Flip: ON. The Visual Script recognizes the right side as the facing direction. However, since this object is created facing left, you need to enable the auto horizontal flip mode.
    Enable Object Condition: CLOSE TO CAMERA. *The object will be disabled and inactive outside the camera’s range.
    HP: 5, MaxHP: 5. Since 1 HP is too low, set it to 5.
    InvincibilityDuration: 0.2 seconds. *This is the invincibility duration after taking damage. Since 1 second is too short, set it to 0.2 seconds.

  3. Normally, various collision checks and animation settings are also required, but since these are pre-configured in the template object, the basic setup is complete.

Explanation

About Invincibility Duration
The invincibility duration is very important. If no invincibility duration is set, attacks will continuously hit until the attack detection disappears. On the other hand, if the duration is too long, continuous attacks like machine-gun fire may not register due to invincibility. Adjust the settings to find the optimal configuration for your project.

STEP 2: Create the Enemy (Zombie) Script

  1. Select the :scroll: + icon to create a new Visual Script.
  2. Rename the first state to Walk and set the animation to the walking animation E_01_act_003. Also, set the display direction to Left. (By default, it is placed facing right.)

  3. Set TemplateMove as the execution action for Walk. The template type can remain horizontal, but disable the “turn back” option. This disables turning back based on time, so the zombie will only reverse direction when hitting a wall.

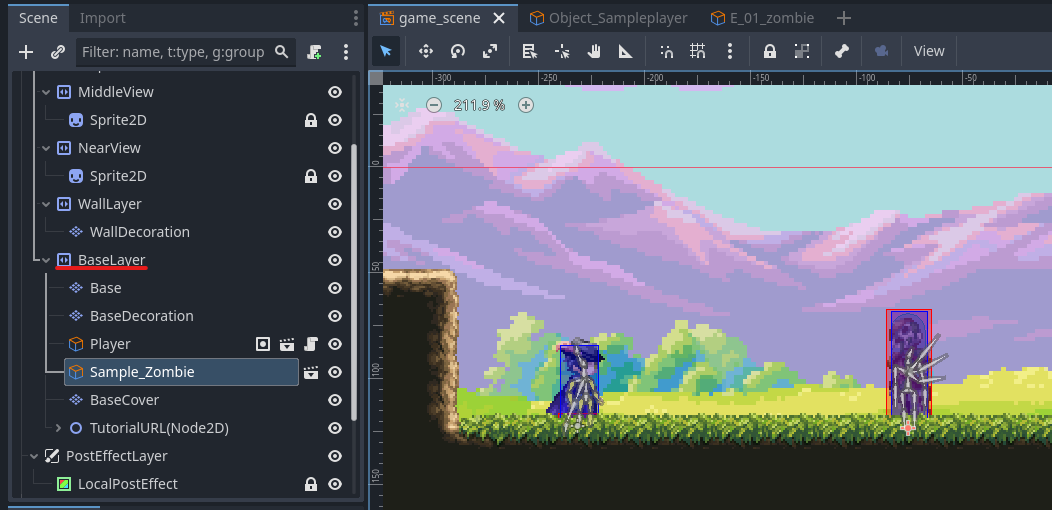
  4. Try placing it in the game scene. Place sample_zombie.tscn as a child of BaseLayer.

  5. Test the game. The zombie should move with a walking motion toward the left. Success is confirmed if the zombie disappears when hit by a bullet. If it does not move correctly, check the following:
    Zombie moves in the wrong direction: The flip left/right mode in the basic settings may not be enabled, or the Walk state’s display direction may not be set to left.
    Bullet disappears even when hitting the zombie: There may be an issue with the bullet script. Check if the object’s collision detection and contact are set up correctly.
    Note: It is normal for the zombie not to die even if hit by bullets many times, as the death state has not been set yet.

  6. Next, create a damage state for the zombie. Create a new state named Damaged near AnyState. Set the animation to the damage animation E_01_act_008.

  7. Next, in the action settings, set the horizontal movement speed to 10%. This will make the zombie move slower during the damage action.

  8. Add three actions. The first is PlayAudio. Set AudioData to Zombie2.

  9. The second is Wait. Add a 0.2-second wait to this execution action. This provides time for the animation to play.

  10. The third is TransferToAction (return to the previous action). There are no specific settings, so add it as is.

  11. Now, the zombie will groan and return to the previous state after 0.2 seconds. The previous state will be explained next.

  12. Connect a link from AnyState to Damaged. AnyState, as the name suggests, represents all states. This means that from any state, if the condition is met, the zombie will transition to Damaged via this link. “TransferToAction” (return to the previous state) is exclusive to AnyState and allows returning to the state before the transition. Those familiar with RPG Maker might recognize this as a Common Event. Note: For small-scale scripts like this zombie, it is possible to connect directly without using AnyState, but since connecting links from all states of an object with many states is very difficult, this method is used for the tutorial.

  13. Add two conditions to the link. The first is ContactWithAttackArea (contact with the attack hitbox). Set it to trigger when hit by the Player from any direction.

  14. The second condition is HP=0. Set it as follows:
    Target: This Node
    Invert Condition (Is Reversed): On *As the name suggests, this inverts the condition. Meaning, when HP is not 0.
    Logical Condition with Previous Condition (Connection With Previous Condition): AND *Keep it as AND here. This is because we want to transition only when damaged and HP is not 0.

  15. Now that the damage settings are complete, test the behavior. If set up correctly, the zombie should groan and stagger when hit, and after taking damage 5 times, it should stop staggering. If it does not work correctly, check the following:
    Damage action not playing: Check if the link is correct, especially if the HP=0 condition is properly inverted. Also, verify that the animation is correctly set for Damaged.
    Damage action plays every time: Ensure the link’s logical condition is set to AND.

  16. Finally, create the death action. Create a new state named Dead and set the animation to E_01_act_009.

  17. In the action settings, set the horizontal movement speed to 0%. This prevents movement during the death animation.

  18. Add three actions. The first is ChangeObjectProperty. Set it as follows:
    Type: Object Property *Changes properties of the node (items that can be set in the Inspector).
    Target: Self
    Target Node: AttackCollision *Not AttackArea2D.
    Target Property: disabled
    Value to Assign: On *Disables the attack collision. This is a measure to prevent the player from taking damage by hitting the corpse.

  19. The second is Wait. Add a 0.85-second wait. As before, this wait ensures time for the animation to play.

  20. The third is RemoveSelf (destroy the object). This will disable the attack range, play the death animation, and then disappear.


  21. Connect a link from AnyState to Dead and add the condition HP=0. Do not invert this time.

  22. Finally, test the game again. If everything works correctly, hitting the zombie with 5 bullets should trigger the death animation and cause it to disappear. If it does not work, check the links and actions.

Next tutorial: