Tutorial: "ACTION GAME MAKER from Scratch" Chapter 5

Chapter 5: Enhance the Game’s Presentation and Export It

This section explains how to “polish the presentation of the game that is tentatively complete and make it playable on PC.”

Consider Missing Presentation Elements

Although the game is tentatively complete, the screen feels somewhat bare. How can we make it feel more like a game?

First, we need a background since there isn’t one.

Also, although it’s a game where you defeat enemies, there is no presentation when enemies are defeated. We need a “defeat” presentation for the player, similar to the “defeat” animation.

Furthermore, there is no sound. We also want background music (BGM) and sound effects.

Finally, having a title screen would make it feel even more like a game.

There may be endless other points of concern, but wouldn’t adding these elements make it feel significantly more like a game? Let’s get started right away.

Let’s create a “Parallax Background”.

In Godot, you can create a parallax background using the Parallax2D node. A parallax background is a mechanism that creates a sense of depth by changing the speed at which objects move relative to the camera, making nearby objects move faster and distant objects move slower. This is the same mechanism used in modern smartphone lock screens where images appear to move when you tilt the device.

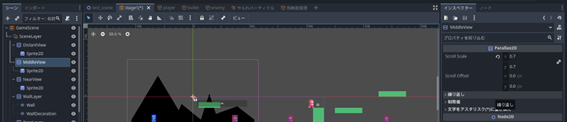
In ACTION GAME MAKER, each layer of the game scene (Base/Wall/NearView/MiddleView/DistantView) is created with Parallax2D, allowing for the realization of a parallax background.

Use the following image to load it and set up the parallax and looping:

  1. Save the image to your PC. Due to system constraints, downloading it directly will result in automatic compression, so click the image to enlarge it before saving.

  2. Drag and drop the saved mountain.png file into the file system.

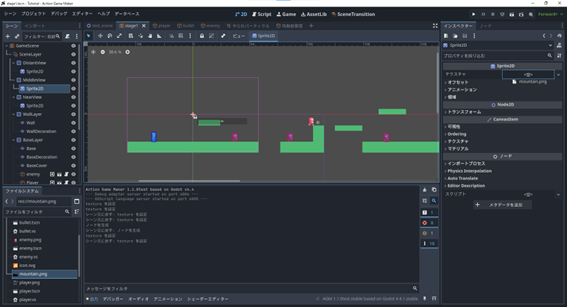
  3. Switch the Scene tab to stage1 and the editor view to 2D.

  4. In the Scene window, select the Sprite2D node within the MiddleView (Parallax2D) layer.

  5. Drag and drop mountain.png into the Texture property in the Inspector.

  1. Select the MiddleView (Parallax2D) layer in the Scene window.

  2. Set the ScrollScale in the Inspector to x=0.7, y=0.7. This means that while the camera and player move a distance of 1, this background will only move 0.7.

  1. Next, click to expand the “Repeat” section in the Inspector.

  2. Set it up as follows:

Repeat Size: x=1080

Repeat Times: 10

This will arrange the image to repeat a total of 10 times for every 1080px width of mountain.png.

  1. Try a test play. If set up correctly, the mountains should move slowly compared to the player, creating a sense of depth.

Checklist if things aren’t working

The background loop feels incorrect: Check the Repeat settings for MiddleView (Parallax2D).

The background speed doesn’t seem to change: Check if the Scroll Scale for MiddleView (Parallax2D) is correct.

Add “Defeated” State to Enemies

You should be able to use the same method as for the player. Add “Display Defeated Particles” to the “Disappearance” state.

If added directly, the enemy will disappear at the same time the particles are displayed, causing the particles to vanish as well. Therefore, use “Wait” to maintain the display duration.

However, there are two issues here: until “Self-Disappearance” is executed, the enemy character continues to move, resulting in a state where “the enemy moves and has attack hitboxes even while defeated.”

Regarding the first issue, “movement,” this is because “Template Movement” is configured. You can address this by either adding “Stop” to the “Template Movement” action or setting the movement speed in the state settings to 0 to prevent movement. In this case, let’s try the latter approach.

The second issue requires “disabling attack hitboxes.” This can be achieved by enabling the “Disabled” property of “AttackCollision” using the “Change Property” action. The “Change Property” action allows you to modify items configurable in the inspector, in addition to variables and switches.

Let’s proceed with the settings.

Add “Display Particles”

  1. Switch the Scene tab to “enemy” and the editor screen to “Script.”

  2. Select the “Disappearance” state and click “+ Add Execution Action.”

  1. Select the “Display Particles” action.

  2. In the particle object path, select “defeated_particles.tscn” and add it.

Add “Wait”

  1. Continue by adding another execution action and select “Wait.”

  2. Since the particle display duration is 1 second, setting the wait time to 1 second is sufficient. Click Add as is.

Set Movement Speed to 0 During This State

  1. Next, set the movement speed to 0. Expand the “Action Settings” in the inspector.

  2. There is an item called “Change Horizontal Movement Speed (%).” Change it from 100 to 0. This will set the movement speed to 0% during this state.

Disable Hitboxes Using “Change Property”

  1. Remove the hitboxes. Click the “+ Add Execution Action” button again.

  2. Select the “Change Property” action and configure it as follows:

Target Object Type: Object Properties
Target Type: Self
Node Name to Modify: AttackCollision
Target Object Name: disabled
Constant Value: On

This will enable the “disabled (disable)” property of “AttackCollision.”

  1. Since the order is currently after “Self-Disappearance,” drag the three-line icon to rearrange the sequence as follows:

① “Display Particles”
② “Change Property (Hitboxes)”
③ “Change Property (Remaining Enemy Count)”
④ “Wait”
⑤ “Self-Disappearance”

Test the Behavior in Test Play

Let’s test the behavior in test play.

Check the following:

  • Effects appear when the enemy is defeated.
  • No damage is taken when colliding with the defeated enemy.

Checklist for Troubleshooting

  • If no effects appear and the enemy disappears immediately: Verify the order is correct and that “Self-Disappearance” is the last action.
  • If damage is taken when colliding with the defeated enemy: Confirm that the “disabled” property of AttackCollision is correctly enabled in the “Change Property” action.

Adding “Sound”: Managing Sound in ACTION GAME MAKER

Next, let’s configure the “sound.” First, consider what kinds of “sound” you will need.

For “BGM,” you will likely need two tracks: one for the stage and another for the title screen, which we will create shortly.

For “SE” (sound effects), you will need several, so let’s consider them by object.

For the player, you will need four sounds: “jump sound,” “bullet firing sound,” “sound when taking damage,” and “sound when defeated.”

For enemies, you will likely need “sound when taking damage” and “sound when defeated.”

You will also want a sound when the stage is cleared, so the “remaining enemy count management” will require a “stage clear sound.”

In total, we have determined that you need two BGM tracks and seven SEs.

Managing Sound in “ACTION GAME MAKER”

In ACTION GAME MAKER, sound is managed using a dedicated database called the “Sound Database.” BGM/SE registered in the “Sound Database” can be played using the Visual Script action “Play Sound.”

Therefore, let’s start by registering data in the Sound Database.

Registering Sound in the Sound Database

For the two BGM tracks and seven SE data files, please use the following files we have prepared. They are compressed in a Zip file, so please extract them and load them into the file system. Afterward, register them in the Sound Database. At this time, there is a function to batch-import sound sources placed in a specified folder, so please use that function.

sounds.zip (1.4 MB)

  1. Save sounds.zip to your PC.

  2. Extract sounds.zip using “Extract All.”

  3. Drag and drop the extracted sounds folder into the file system to load it.

  4. As shown below, if the sounds folder is directly under res://, and it contains a bgm folder and an se folder, the process was successful. If, due to an issue with the extraction software, you end up with a structure like res://sounds/sounds/bgm (where a sounds folder exists inside another sounds folder), please move the folder within the file system by dragging it so that it matches the state shown in the image below.

  1. Click the “Database” button in the top-left corner.

  2. The “Data Management” window will appear; switch to the “Sound Database” tab.

  1. Click the “Batch Settings” button located at the top-left of the window. If nine sound data entries are registered as shown below, it is OK. The “Batch Settings” button automatically registers sound source data located in the specified folders (res://sound/bgm, res://sound/se).

Checklist for when things don’t work

Please check if the position of the sounds folder is correct. Ensure it is directly under res:// and not nested inside another folder.

Let’s Set Up Sound Effects for the Player.

Now, let’s proceed to set up the sound effects, starting with the player. We will add the “Jump Sound,” “Bullet Firing Sound,” “Damage Taken Sound,” and “Defeated Sound” to their respective states.

Add Sound to the “Jump” State.

  1. Switch the Scene tab to “player” and the Editor view to “Script.”

  2. Select the “Jump” state.

  3. In the Inspector, click “+ Add Execution Action.”

  1. Select the “Play Sound” action.

  2. Select the sound data “se_player_jump(se_player_jump.ogg)” and click “Add.”

  1. Try a test play. If configured correctly, you should hear a sound effect when jumping with the Z key.

Add “Play Sound” Action to “Ground Shot,” “Air Shot,” and “Movement Shot.”

Next, we will add shooting sounds. There are three shooting states, so let’s configure each one.

  1. Select the “Ground Shot” state.

  2. In the Inspector, select “+ Add Execution Action.”

  3. Choose the execution action “Play Sound.”

  4. Set the sound data to “se_player_shot(se_player_shot.ogg)” and click “Add.”

  1. While you could repeat this process, execution actions can also be copied and pasted, so let’s try using copy/paste.

  2. Right-click the added “Play Sound” action and select “Copy.”

  1. Select the “Movement Shot” state.

  2. Change the size of the Execution Action field in the Inspector from 1 to 2. This item sets the number of execution actions.

  1. A “” item will appear; right-click it and select “Paste.”

  2. If the “Play Sound” action is pasted as shown below, it is successful.

  1. Select the “Air Shot” state and repeat steps 7 to 10 to copy/paste the “Play Sound” action.

  2. Once completed, try a test. Fire a bullet with the X key while waiting, moving, or jumping, and confirm that the same sound plays.

Add “Play Sound” to the “Damage Taken” State.

Next, adding sound to the Damage Taken state. Since the procedure for adding “Play Sound” is the same, the explanation will be abbreviated.

  1. Add the “Play Sound” action and select the sound data “se_player_damage(se_player_damage.ogg).”

  1. Since a Wait action is included in the Damage Taken state, drag the three-line icon of the “Play Sound” action to move it before the Wait action.

  1. Perform a test play and check if the sound plays when hitting an enemy.

Add “Play Sound” to the “Defeated” State.

  1. Select the “Defeated” state and add the “Play Sound” action by selecting the sound data “se_player_down(se_player_down.ogg).”

  1. Perform a test play. If the sound plays when falling or when HP reaches 0, the player’s sound settings are OK.

Let’s Set SE for the Enemy

Next, let’s set SE (Sound Effects) for the “enemy”. There are two types: “sound on taking damage” and “sound when defeated”. However, the “enemy” does not have a “Taking Damage” state. In such cases, you can use the TakenDamageSettings (Damage Taken Settings) node, so let’s try using it.

Let’s Play SE Using the TakenDamageSettings (Damage Taken Settings) Node

  1. Switch the Scene tab to “enemy”.

  2. In the Scene window, select the TakenDamageSettings node.

  3. Expand the “Damage Taken Data List” in the Inspector.

  4. Click “+ Add Damage Taken Settings”.

  1. Click and select “New TakenDamageData”.

  2. Expand the generated “TakenDamageData”.

  1. Expand “> Other Settings”.

  2. Set “Play Sound” to “On”, and set “se_enemy_damage” in the “Sound Data” field.

  1. Let’s try a test play. If the SE plays when a bullet hits the enemy, it is successful.

Add “Play Sound” to the Enemy’s “Disappearance” State

This is the same as before.

  1. Select the “Disappearance” state and click “+ Add Execution Action”.

  2. Select the “Play Sound” action, choose “se_enemy_down (se_enemy_down.ogg)” in the Sound Data field, and add it.

  1. Rearrange the order of actions by moving “Play Sound” before “Insert Wait”. This completes the setup.

  1. Let’s try a test play. If the SE plays when the enemy is defeated, it is successful.

Let’s Set Up Stage BGM and Stage Clear SE

For BGM, the “Loop Playback” setting must be configured in advance. This can be adjusted in the “Import” settings.

Next, regarding where to play the BGM, it seems appropriate to play it in the “Count” state of the “Remaining Enemy Management” object, which is always displayed.

Additionally, the stage clear SE can likely be set in the “Stage Clear” state of the “Remaining Enemy Management” object as well.

Loop the BGM in the “Import” Settings

You can change the settings of assets selected in the “File System” using the “Import” window, which can be accessed by switching tabs from the “Scene Window”.

  1. Select bgm_stage1.ogg located in the sounds folder/bgm folder within the “File System”.

  1. Switch the tab in the Scene Window at the top left to “Import”.

  2. In the Import window, set “Loop” to “On” and click the “Re-import (*)” button.

  1. A progress bar indicating that assets are being (re)imported will appear; once it closes automatically, the process is complete.

  1. Repeat steps 2 to 4 to also enable looping for the other BGM file, bgm_title.ogg.

Play BGM in the “Count” State of “Remaining Enemy Management”

Just like SE, BGM can also be played using the “Play Sound” action, so the procedure is the same as before.

  1. Change the Scene tab to “Remaining Enemy Management”.

  2. Select the “Count” state and add an action to play bgm_stage1 using the “Play Sound” action.

  1. Perform a test play to check if the BGM starts playing simultaneously with the stage start.

Play SE in the “Stage Clear” State of “Remaining Enemy Management”

Select the “Stage Clear” state and configure it to play “se_stageclear” using the “Play Sound” action.

Once configured, perform a test play to check if the SE plays when all enemies are defeated.

Let’s Set Up the “Title Screen”

Now, let’s set up the title screen.

It would be good to create the title screen as a new game scene, where performing an action on the title screen starts Stage 1.

ACTION GAME MAKER has a dedicated Scene Transition (SceneTransition) feature, which allows you to configure this.

So, let’s create the “Title Screen” game scene, configure it, and connect the two scenes using “Scene Transition.”

Considering the Functionality of the “Title Screen”

Since this is a simple game, let’s make the title screen a scene where text is displayed on the background, BGM is playing, and pressing Jump (Z key) starts Stage 1. In other words, we can achieve this by creating a new game scene, setting the title background in the UI scene using Sprite2D, displaying the title logo, and placing a UI game object to play sound.

Similar to Visual Scripting, “Scene Transition” also allows you to configure scene changes based on specific key inputs, so the transition via Jump can be set there.

Let’s Create a Game Scene for the “Title Screen”

  1. Open a new scene tab and create a root node: select “Game Scene.”

  1. Once created, save the scene. Since this is the title, let’s save it as “title_scene.tscn.”

Let’s Set the Background for the “Title Screen” Game Scene

  1. Use the following image for the title screen background. Right-click and save it to your PC.

  1. Drag and drop title_bg.png from your PC into the file system to load it.

  2. In the scene view, select the “UI” layer.

  3. While holding the SHIFT key, drag and drop title_bg.png from the file system into the UI layer area (within the blue border) in the scene view. Dropping while holding SHIFT places it as a child of the selected node, in this case, the “UI” layer.

  1. Check if it is correctly placed as a child of the UI layer. If it is misaligned, drag the TitleBg node in the scene layer to position it correctly.

  1. Now, this background image is set to exactly match the camera size: width 1152, height 648. This means that even a slight misalignment will reveal the gray background, so adjust the placement carefully. Ensure the TitleBG node is selected in the scene window.

  2. Expand the “Transform” section in the Inspector.

  3. Set the x value of the Position property to 576 and the y value to 324. By default, the center of the image is the reference point, so placing it at half the camera size (width 1152, height 648) will align it perfectly.

Create a Game Object for the “Title Logo”

  1. Open a new Scene tab and select “Create Root Node:” to create a game object.

  2. Object Name: title_logo, use the UI template, and leave the Type (Class) empty to create it.

  1. Once created, right-click on the unsaved (*) icon to save the scene. You can keep the name as title_logo.tscn.

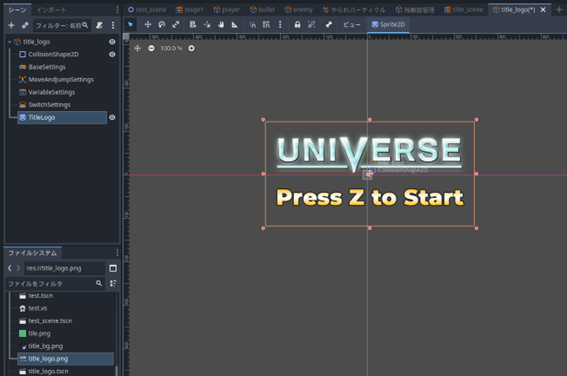
  2. Right-click the following image to save it to your PC.

  1. Drag and drop the saved title_logo.png into the FileSystem to import it.

  2. Drag and drop the title_logo.png from the FileSystem onto the editor window to place it.

Set Up Visual Scripting for the “Title Logo” Game Object

This object only needs to play BGM, meaning it only requires the “Play Sound” action. Therefore, a single state and a single action are sufficient.

  1. Select the title_logo (GameObject) node and attach a script using the :scroll:+ button.

  1. Create the script with the default name.

  1. Rename State001 to “Title” and click “+ Add Execute Action”.

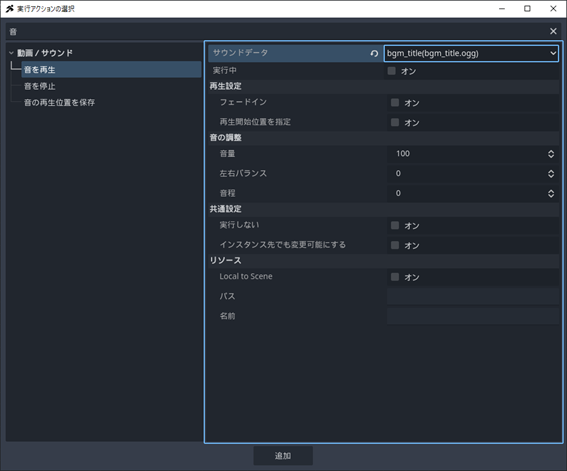
  1. Select the execute action “Play Sound”.

  2. Choose the sound data “bgm_title (bgm_title.ogg)” and click “Add”.

Place the title_logo Object in the Game Scene (title_scene)

  1. Set the Scene tab to title_scene and switch the editor view to 2D.

  2. Select the TitleBG node in the UI layer.

  3. Drag and drop the title_logo.tscn from the FileSystem onto the screen. The title screen setup is now complete. If you placed it but cannot see it, it might be positioned behind the background. Ensure, as shown in the image below, that it is a child of the UI layer in the Scene window and positioned below (in front of) the TitleBG node.

Create a Scene Transition from the “Title Screen” to “Stage1”

Now, let’s create the scene transition from the title screen to Stage1.

The operation of the scene transition screen is roughly the same as visual scripting.

The procedure is as follows: load title.tscn into the “Scene Transition” screen, change the initial scene to title.tscn, and set the transition condition from title.tscn to stage1.tscn, in that order.

After that, let’s set up the transition effects.

  1. Switch the top tab from 2D to SceneTransition.

Image 50

  1. A screen similar to Visual Script will appear. Drag and drop title_scene.tscn from the file system onto the screen to load it.

  1. Change the start scene to Title. Right-click on title_scene and select “Set as Initial Scene” from the menu.

  1. Next, add a link. Right-click on title_scene, select “Add Link,” and connect it to stage1.

  2. Expand “Switch Condition” in the Inspector.

  3. Turn on “When the following input operation is performed.”

  4. In the Input Operation List, set up in order: “+ Add Input,” “,” and “New Input Condition.”

  1. Expand “Input Condition,” and set Input Key: Jump, Input Condition: Pressed.

  1. Next, let’s set up the effects. Expand “Pre-Switch Effect.”

  2. Set the following:

Screen Effect: Slide Up

BGM Effect: Stop

Fade Out: On

Play SE: On

SE: se_enemy_damage (se_enemy_damage.ogg)

With this, when the scene transition starts, the title screen will slide upward while the sound effect of an enemy being hit plays, and the BGM will fade out (gradually getting quieter) and stop.

  1. Next, expand “Post-Switch Effect.”

  2. Set the Screen Effect to “Slide Down.” With this, as the title screen moves up, Stage1 will appear coming down from the top.

Let’s Test Play Once Completed

If implemented correctly, starting a test play should display the title screen, and pressing the Z key should trigger the effect and switch to Stage1.

Checklist for when things don’t work

Starts from Stage1: Check if the initial scene is correctly set to title_scene and if you are using “Run Project (F5)” in test play.

Scene switching doesn’t work: Re-check if the link condition from Title to Stage1 is correctly set.

Let’s Export the Game

Now, the game is essentially complete. The test play you are currently doing is executed through ACTION GAME MAKER, so only people who have ACTION GAME MAKER can play it as it is.

However, through the “Export” function, you can make it playable by anyone.

Let’s try exporting for Windows PCs.

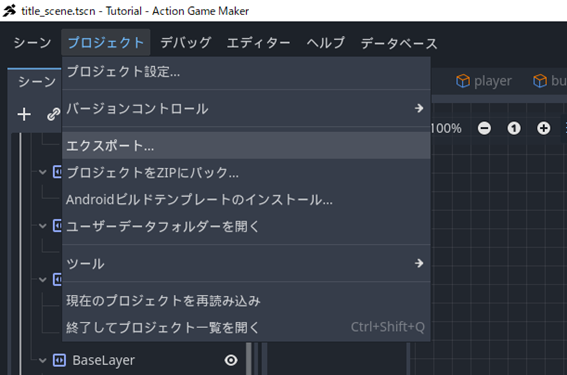
  1. From the Project menu, select “Export”.

  1. The Export window will open. Click the “Add” button and select Windows Desktop. (Although six export destinations are displayed on this screen, as of version 1.1.0, ACTION GAME MAKER officially supports only Android, Web, and Windows Desktop.)

  1. First, specify the export destination path. This is the output location, but by default, it is created directly under the project’s res:// directory. To avoid mixing with assets, create a separate folder.

Click the :page_with_curl: icon at the far right of the export destination path.

  1. The project folder (file system folder) will be displayed. Right-click and create a new folder.

Note

You can also set the export destination to a location other than the “File System”. For clarity, we will set it within the project this time, but in practice, it is better to export to a folder outside the project that is easy for you to manage.

  1. Name it “export” and click OK.

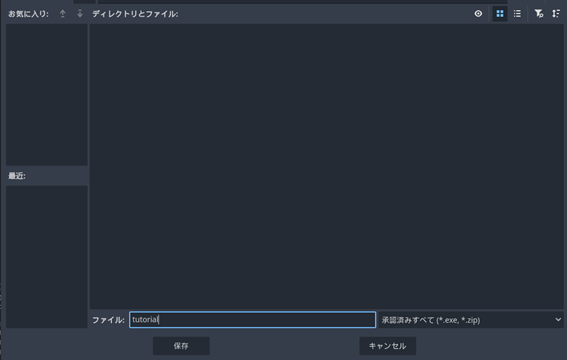
  1. The contents of the created export folder will open. Save the file name as “tutorial”. (This will be the executable file name upon export.)

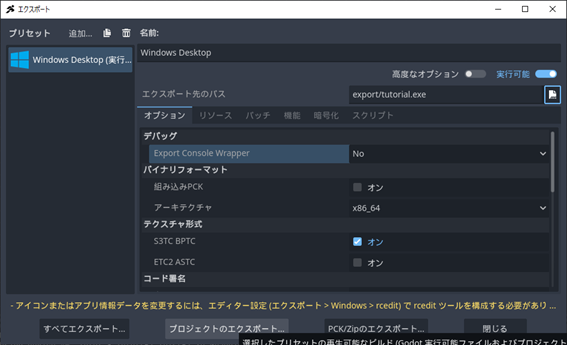
  1. If the export destination path is as shown below, it is correct.

Image 64

  1. Next, there are various option settings, but set only “Export Console Wrapper” to No. This item determines whether to display a debug console window.

  1. Click the “Export Project” button.

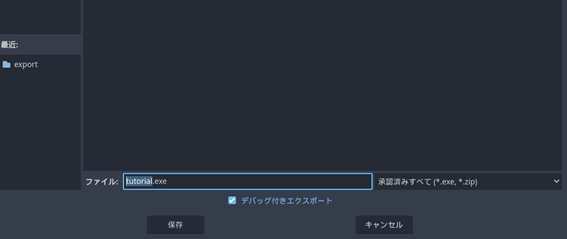
  2. A save window will appear. Since the folder and executable file name specified earlier are displayed, simply click Save.

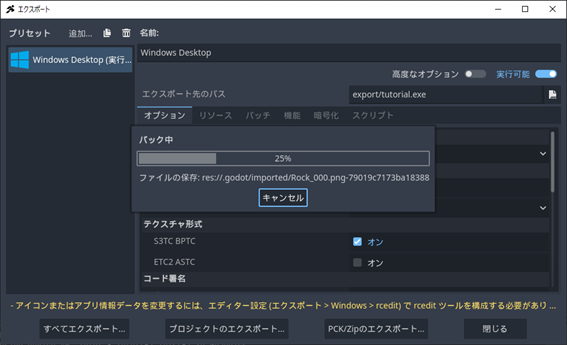
  1. A progress bar indicating “Packing” will appear as shown below, so wait a moment.

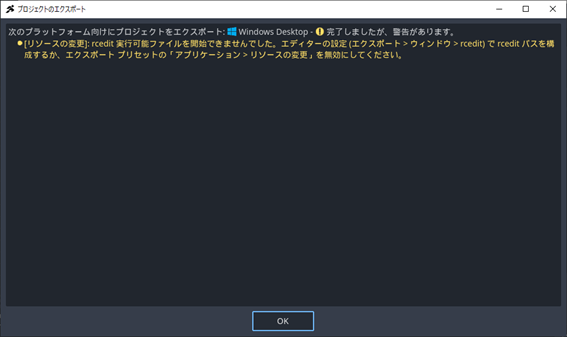
  1. The following warning will appear, but the export has completed successfully. This is a warning that a function called rcedit, which saves data such as the executable file icon and author name, did not execute normally. However, since we did not set this in the first place, there is no problem.

Also, an error message “ERROR: Could not create child process: rcedit export/tutorial.exe --set-icon…” may appear in the output window, but this is the same issue and is not a problem.

Let’s Test the Exported Game

  1. Close the Export window.

  2. Right-click the export folder in the file system and click “Open in File Manager”.

  3. Windows Explorer will open, and you should see two files inside the export folder: tutorial.exe and tutorial.pck. The exe file is the game executable, and the pck file contains the assets required for execution.

Image 70

  1. Double-click tutorial.exe to launch it.

A window titled “Tutorial(DEBUG)” should appear, allowing you to play the game.

With this, the game you created can now be played by anyone with a Windows PC. If you want someone else to play it, share both tutorial.exe and tutorial.pck together.

Conclusion

You are a small game, but you have become a great game creator who has completed a game!

Congratulations!

There are many things you might want to do with this game, such as adding a double jump, implementing wall jumps, adding sliding, introducing charge shots, enabling weapon switching, or including boss battles. You might also be thinking about creating games in entirely different genres.

From here on, let’s create what you want to make!

It may seem difficult, but through this tutorial, you have learned the basics of game development and thoroughly understood ACTION GAME MAKER from its core concepts. With that foundation, you should be able to create various games depending on your creativity.

As long as you have the imagination to think, “If I combine this action with this condition, I can do something like this,” you’ll be fine.

If you can’t think of anything or encounter difficulties, try searching on the RPG Maker Guild or asking questions on the official Discord.

On the RPG Maker Guild, you can search by typing text into the search bar at the top right.

Here is the official Discord channel created for communication.

https://discord.gg/vfaV86vYd9