Tutorial: "Getting Started with ACTION GAME MAKER" — Chapter 5

Chapter 5: Enhancing the Game’s Presentation and Exporting

In this chapter, we will learn how to polish the completed game’s presentation and ultimately make it playable on PC.


Thinking: What’s Missing from the Game Now?

Although the game is functionally complete, the visual presentation still feels somewhat plain.
To make it feel more like a “real game,” what elements can we add?

  • First, there is no background, so adding one will give the scene more depth.

  • This is a “defeat enemies” game, so we should also add defeat effects when enemies are destroyed, similar to the player’s “death effect.”

  • Currently, there is no sound at all, so we need to include BGM and sound effects.

  • Finally, adding a title screen would significantly boost the overall completeness of the game.

Of course, we could add even more details to further refine the game, but with these elements in place,
the game will already be very close to a finished product.

So, let’s start here and complete it step by step!

Creating a Parallax Background

In Godot, you can use the Parallax2D node to create a parallax background.
A parallax background creates a sense of depth by making closer objects move faster and distant objects move slower.

You may have seen similar effects on smartphone lock screens: when you tilt the phone, the background image shifts slightly, giving a more three-dimensional appearance.

In ACTION GAME MAKER, every game scene layer
(Base / Wall / NearView / MiddleView / DistantView)
is built upon Parallax2D, making it very convenient to create parallax backgrounds.

In this section, we will use the image below, import it into the project, and set up parallax and tiling effects.


Steps

  1. Save the image below to your computer.
    :warning: Due to system limitations, if downloaded directly, the image may be compressed.
    Please click the image to enlarge it first, then save.

  2. Drag the saved mountain.png into the editor’s FileSystem.

  3. Switch to the stage1 scene tab and set the editor view to 2D.

  4. In the Scene panel, select the Sprite2D node under the MiddleView (Parallax2D) layer.

  5. In the Inspector, drag mountain.png into the Texture property.

  6. Next, select the MiddleView (Parallax2D) node itself in the Scene panel.

  7. In the Inspector, set Scroll Scale to:

    • x = 0.7
    • y = 0.7

    • This means that when the camera and player move 1 unit, the background will only move 0.7 units, creating a depth effect.
  8. Next, expand the Repeat settings in the Inspector.

  9. Set the following values:

    • Repeat Size: x = 1080
    • Repeat Times: 10

    This means the 1080px wide mountain.png will be repeated 10 times horizontally.

  10. Run a test (Test Play).
    If configured correctly, you’ll see the mountain background moving slower than the player, creating a noticeable sense of depth.


Troubleshooting Common Issues

  • Background tiling looks unnatural
    → Check whether the Repeat settings under MiddleView (Parallax2D) are correctly configured.

  • No noticeable difference in background movement speed
    → Confirm that Scroll Scale is correctly set to 0.7 / 0.7.

Adding Death Effects for Enemies

We can use the same method as for players to add a “death particle” effect for enemies.
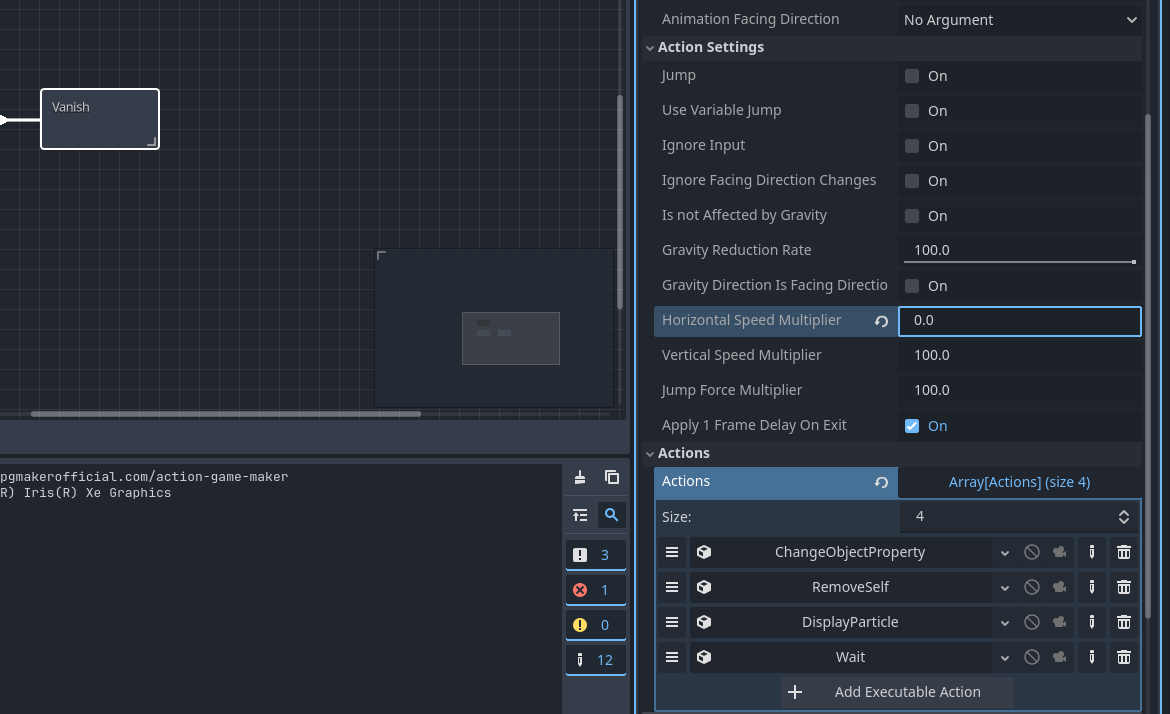
Specifically, display the Death Particle during the enemy’s Vanish state.

However, if we simply add the particle display, the enemy will be removed at the same time the particle appears,
resulting in the particle disappearing immediately.
To solve this issue, we need to use the Wait action to let the particle display for a period of time before removing the enemy.

Additionally, there are two other issues to address:

  1. Before executing Vanish, the enemy continues to move, appearing as if still alive, and attack detection remains active.
  2. During the death sequence, we need to disable the enemy’s AttackCollision.

The corresponding solutions are:

  • Regarding movement issue
    The reason is that Template Move is still active.
    You can use “Template Move: Stop” or directly set the movement speed to 0.
    This tutorial adopts the method of setting movement speed to 0.

  • Regarding attack detection issue
    We need to disable AttackCollision.
    This can be accomplished using the ChangeObjectProperty action,
    setting the disabled property of AttackCollision to On.

Proceed with the following steps:


Add “DisplayParticle”

  1. Open the enemy scene and switch the editor to the Script view.

  2. Select the Vanish state and click + Add Executable Action.

  3. Select DisplayParticle.

  4. In the particle object path, select death_particle.tscn, then click Add.


Add “Wait”

  1. Add another executable action and select Wait.

  2. Since the particle display duration is 1 second, set the wait time to 1.0 seconds, then click Add.


Set Movement Speed to 0 in This State

  1. In the Inspector, expand Action Settings.

  2. Change the value of Horizontal Speed Multiplier from 100 to 0.

    • This ensures the enemy does not continue moving during the death sequence.


Use “Change Property” to Disable Attack Collision

  1. Add another executable action.

  2. Select ChangeObjectProperty and configure it as follows:

    • Target Object Type: Object Property
    • Target Type: Self
    • Target Node Name: AttackCollision
    • Target Object Name: disabled
    • Constant Value: On

    This enables the Disabled property of the AttackCollision node.


Adjust Execution Order

Ensure the execution order of actions is correct.
Use the drag icon with three horizontal lines to adjust the order to:

  1. DisplayParticle
  2. ChangeObjectProperty (disable AttackCollision)
  3. ChangeObjectProperty (decrease Remaining Enemies)
  4. Wait
  5. RemoveSelf


Test Behavior

Run the test and confirm the following:

  • When defeating an enemy, the particle effect displays correctly.
  • After being defeated, the enemy no longer deals damage upon collision with the player.


Troubleshooting Common Issues

  • No effect appears; enemy disappears immediately
    → Ensure RemoveSelf is the last action in the execution list.

  • Enemy still deals damage after being defeated
    → Confirm that ChangeObjectProperty correctly sets the
    disabled property of AttackCollision to On.

Adding Sound Effects: Audio Management in ACTION GAME MAKER

Next, let’s set up the sound effect system.
First, we need to organize which sounds are required in the game.


What Sounds Are Needed?

BGM (Background Music)

At least two tracks are required:

  • Stage BGM
  • Title Screen BGM (to be created later)

SE (Sound Effects)

Depending on the object, the following sound effects are needed:

  • Player

    • Jump sound effect
    • Bullet firing sound effect
    • Hurt sound effect
    • Defeated sound effect
  • Enemy

    • Hurt sound effect
    • Defeated sound effect
  • Stage Clear

    • Clear sound effect (triggered by Remaining Enemies Manager)

Total Number of Sound Effects

  • BGM: 2
  • SE: 7

Total: 9 audio files.


How ACTION GAME MAKER Manages Audio

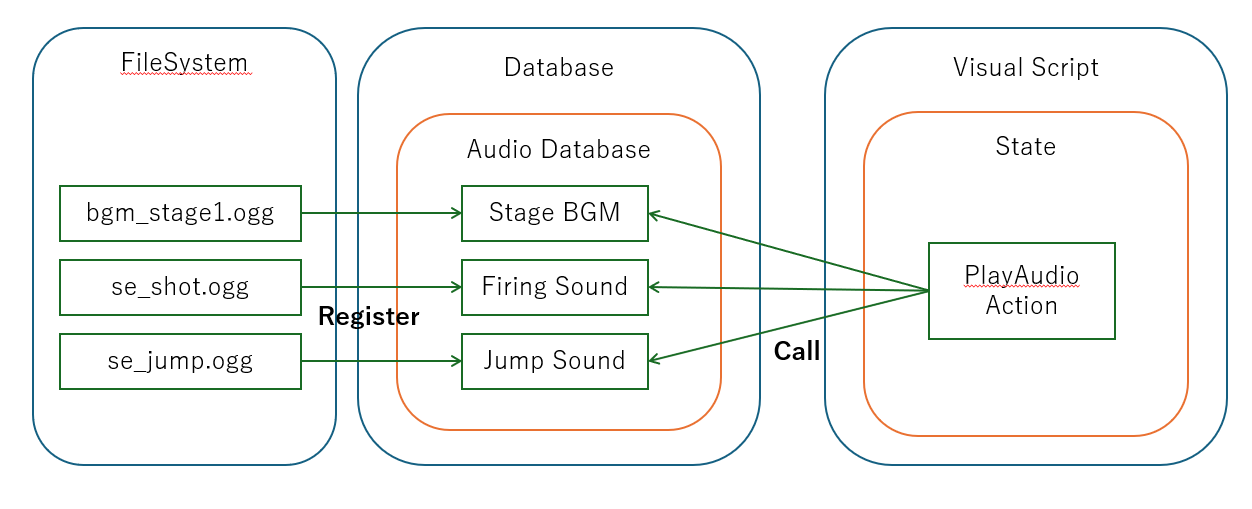
In ACTION GAME MAKER, all sound effects are managed through a dedicated Sound Database.

Both BGM and SE registered in the Sound Database can be played in Visual Script using the PlayAudio action.

Therefore, the first step is:
:backhand_index_pointing_right: Register the audio files into the Sound Database.


Registering Sound Effects into the Sound Database

This tutorial uses a pre-prepared sound effect collection, including:

  • 2 BGM tracks
  • 7 SE tracks

All are packaged in the sounds.zip file and already organized into folders.

sounds.zip (1.4 MB)


Procedure

  1. Save sounds.zip to your local computer.

  2. Extract the zip file.

  3. Drag the extracted sounds folder into the editor’s FileSystem panel.

  4. Confirm the folder structure is as follows:

Adding SE (Sound Effects) for the Player

Next, we will set up SE (Sound Effects), starting with the Player.

We will add sound effects for the following player states:

  • Jump
  • Shot
  • Take Damage
  • Death

Adding Sound Effect for the “Jump” State

  1. Switch the scene to player and change the editor view to Script.

  2. Select the Jump state.

  3. In the Inspector, click + Add Executable Action.

  4. Select the PlayAudio action.

  5. In Audio Data ID, select
    se_player_jump (se_player_jump.ogg), then click Add.

  6. Run the test.
    If configured correctly, pressing the Z key to jump will play the jump sound effect.


Adding Shooting Sound Effects for “Ground Shot / Moving Shot / Air Shot”

Next, we will add shooting sound effects.
Since shooting has three states, we need to add the same sound effect to each state.


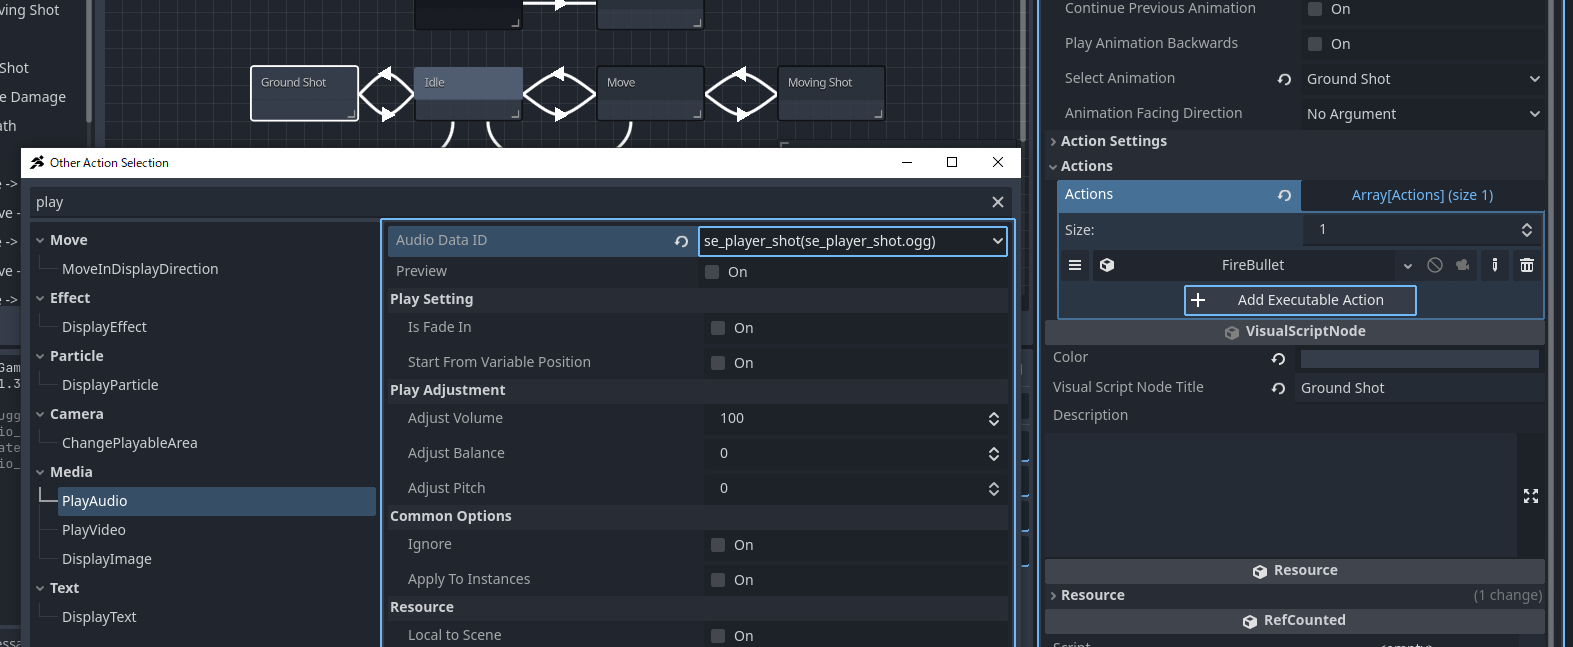
Adding Sound Effect to Ground Shot

  1. Select the Ground Shot state.

  2. In the Inspector, click + Add Execution Action.

  3. Select PlayAudio.

  4. Set the audio to
    se_player_shot (se_player_shot.ogg), then click Add.


Copy and Paste to Other Shooting States

Execution actions can be copied and pasted, avoiding redundant setup.

  1. Right-click the newly added PlayAudio action and select Copy.

  2. Select the Moving Shot state.

  3. In the Inspector, change the size of Execution Actions from 1 to 2.

  4. Right-click the newly appeared \u003cempty\u003e entry and select Paste.

  5. If the PlayAudio action appears, the paste was successful.

  6. Repeat steps 6–8 for the Air Shot state.

  7. Run the test.
    Pressing the X key to shoot while standing / moving / jumping should play the same shooting sound effect.


Adding Sound Effect for the “Take Damage” State

Next, we will add a sound effect for the Take Damage state. The process is the same as before; here’s a brief summary:

  1. Add a PlayAudio action in the Take Damage state.

  2. Select the audio
    se_player_damage (se_player_damage.ogg).

  3. Since a Wait action already exists in this state,
    drag PlayAudio to before Wait to ensure the sound effect plays immediately.

  4. Run the test.
    When the player collides with an enemy and takes damage, the damage sound effect should play.


Adding Sound Effect for the “Death” State

Finally, add a sound effect for when the player is defeated.

  1. Select the Death state.

  2. Add a PlayAudio action.

  3. Select the audio
    se_player_down (se_player_down.ogg).

  4. Run the test.
    When the player falls into a pit or HP reaches zero, the defeat sound effect should play.


:white_check_mark: All player-related sound effects (SE) have now been fully configured.

Adding SE (Sound Effects) for Enemies

Next, let’s set up sound effects for the Enemy.

Enemies only need two types of sound effects:

  • Damage SE (Damage Sound Effect)
  • Defeat SE (Defeat Sound Effect)

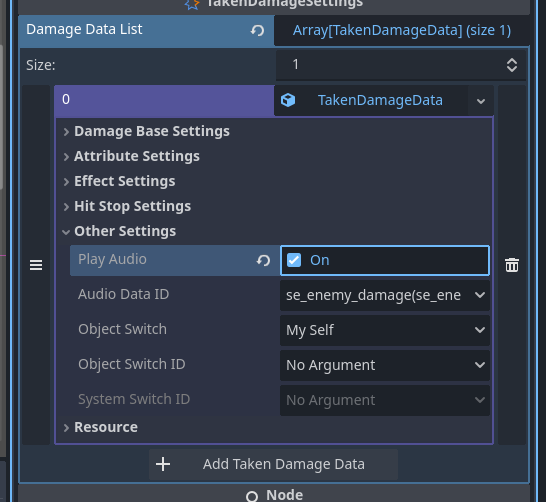
However, unlike the player, enemies do not have a dedicated Damage State. In this case, we can use the TakenDamageSettings node to play the sound effect directly when the enemy takes damage.


Using the TakenDamageSettings Node to Play Damage SE

  1. Switch the scene to enemy.

  2. In the Scene window, select the TakenDamageSettings node.

  3. In the Inspector, expand the Damage Taken Data List.

  4. Click + Add Damage Taken Setting.

  5. Click \u003cempty\u003e and select New TakenDamageData.

  6. Expand the newly created TakenDamageData.

  7. Expand Other Settings.

  8. Set Play Sound to On, and in Audio Data ID, select se_enemy_damage.

  9. Run a test.
    If the setup is correct, the enemy’s damage sound effect will play when a bullet hits the enemy.


Adding Defeat SE in the Enemy’s “Vanish” State

Next, let’s add the defeat sound effect when the enemy is defeated. This step is similar to how we handled the player—simply play the sound effect directly in the Vanish state.

  1. Select the enemy’s Vanish state.

  2. Click + Add Executable Action.

  3. Choose PlayAudio, and set the audio to se_enemy_down (se_enemy_down.ogg).

  4. Adjust the execution order so that PlayAudio comes before the Wait action.

  5. Run a test.
    If the setup is correct, the defeat sound effect will play when the enemy is defeated.


:white_check_mark: At this point, both the Damage SE and Defeat SE for the enemy have been correctly set up.

Setting Level BGM and Stage Clear SE

When setting up BGM, the first step is to enable Loop in the Import (Import Settings).

After that, the most suitable place to play level BGM is in the “Count” state of the Remaining Enemies Manager — a UI object that is always present.

As for the Stage Clear SE, it can be set in the “Stage Clear” state of the same object.


Enabling BGM Loop in Import Settings

After selecting a resource in the FileSystem, you can modify its import settings via the Import tab (located next to the Scene tab).

  1. In the FileSystem, navigate to the sounds/bgm folder and select bgm_stage1.ogg.

  2. Switch the tab at the top of the Scene panel to Import.

  3. In the Import panel, enable Loop, then click Reimport.

  4. Once the “Reimporting asset” progress bar finishes and disappears, the setup is complete.

  5. Repeat steps 2–4 for bgm_title.ogg, ensuring both BGMs play correctly in a loop.


Playing Level BGM in the “Count” State

Like SE, BGM is played using the PlayAudio action, so the process is identical.

  1. Switch the scene to Remaining Enemies Manager.

    image

  2. Select the Count state.

  3. Add a PlayAudio execution action and set the audio data to bgm_stage1.

  4. Run a test to confirm that the BGM plays automatically when the level starts.


Playing Stage Clear SE in the “Stage Clear” State

  1. Select the Stage Clear state.

  2. Add a PlayAudio action and set the sound effect data to se_stageclear.

  3. Run a test to confirm that the Stage Clear SE plays after all enemies are defeated.


:white_check_mark: Troubleshooting Checklist:

  • Confirm that the sounds folder is directly under res://, not nested inside other folders.
  • Confirm that Loop is enabled for BGM and that Reimport has been executed.
  • Confirm that the PlayAudio action is placed in the correct state:
    • Level BGM → Count
    • Stage Clear SE → Stage Clear

Setting Up the Title Screen

Now, let’s create and configure the Title Screen.

The title screen will be created as a new Game Scene, and in this screen, we will transition to stage1 when a button is pressed.

ACTION GAME MAKER provides a dedicated SceneTransition feature, which makes it very easy to implement this flow.

Therefore, we will create a Title Screen scene and connect it to stage1 using SceneTransition.


Planning the Title Screen Composition

Since this is a simple game, the title screen only needs the following elements:

  • A background image
  • A title logo
  • BGM playing
  • Transition to stage1 when the Jump (Z key) is pressed

For implementation, we will:

  • Create a new Game Scene
  • Use Sprite2D in the UI layer to place the background
  • Add a UI Game Object to display the title and play sound

Similar to Visual Script, SceneTransition can also be configured to trigger a scene change when a specific key is pressed, which is exactly how we’ll handle the Z key to start the game.


Creating the Title Screen Game Scene

  1. Open a new scene tab.

  2. When creating the root node, select Game Scene.

  3. Immediately save the scene as title_scene.tscn.


Adding a Background to the Title Screen

  1. Use the prepared title screen background image
    (right-click the image and save it locally).

  2. Drag title_bg.png into the editor’s FileSystem to import it.

  3. In the Scene panel, select the UI layer.

  4. Drag title_bg.png from the FileSystem into the editor view, and hold the SHIFT key while dragging.

    • Holding SHIFT ensures the image is added as a child node of the currently selected node (in this case, the UI layer).
  5. Confirm that the background node has correctly become a child of the UI layer.

    • If the position is incorrect, you can manually drag the TitleBG node to the correct position in the Scene tree.
  6. This background image is exactly the same size as the camera view:
    1152 width × 648 height.

    • If the alignment is off, the gray background will show through, so we need to align it precisely.
  7. Select the TitleBG node, and expand Transform in the Inspector.

  8. Set the position to:

    • Position X = 576
    • Position Y = 324

    • Since Sprite2D’s origin is at the center of the image, placing it at half the screen width and height aligns it perfectly with the camera view.

:white_check_mark: At this point, the background of the title screen has been cleanly and accurately set up.

Create the “Title Logo” Game Object

Next, we’ll create the Title Logo object for the title screen.
This object will be responsible for displaying the title image and playing the title BGM in the title screen.


Create the Title Logo Game Object

  1. Open a new scene tab.

  2. In Create Root Node, select Game Object.

  3. Set the following:

    • Object Name: title_logo
    • Use Template: UI
    • Type: Empty

    Then click Create.

  4. Right-click the Unsaved tab and save the scene as title_logo.tscn.


Set the Title Logo Image

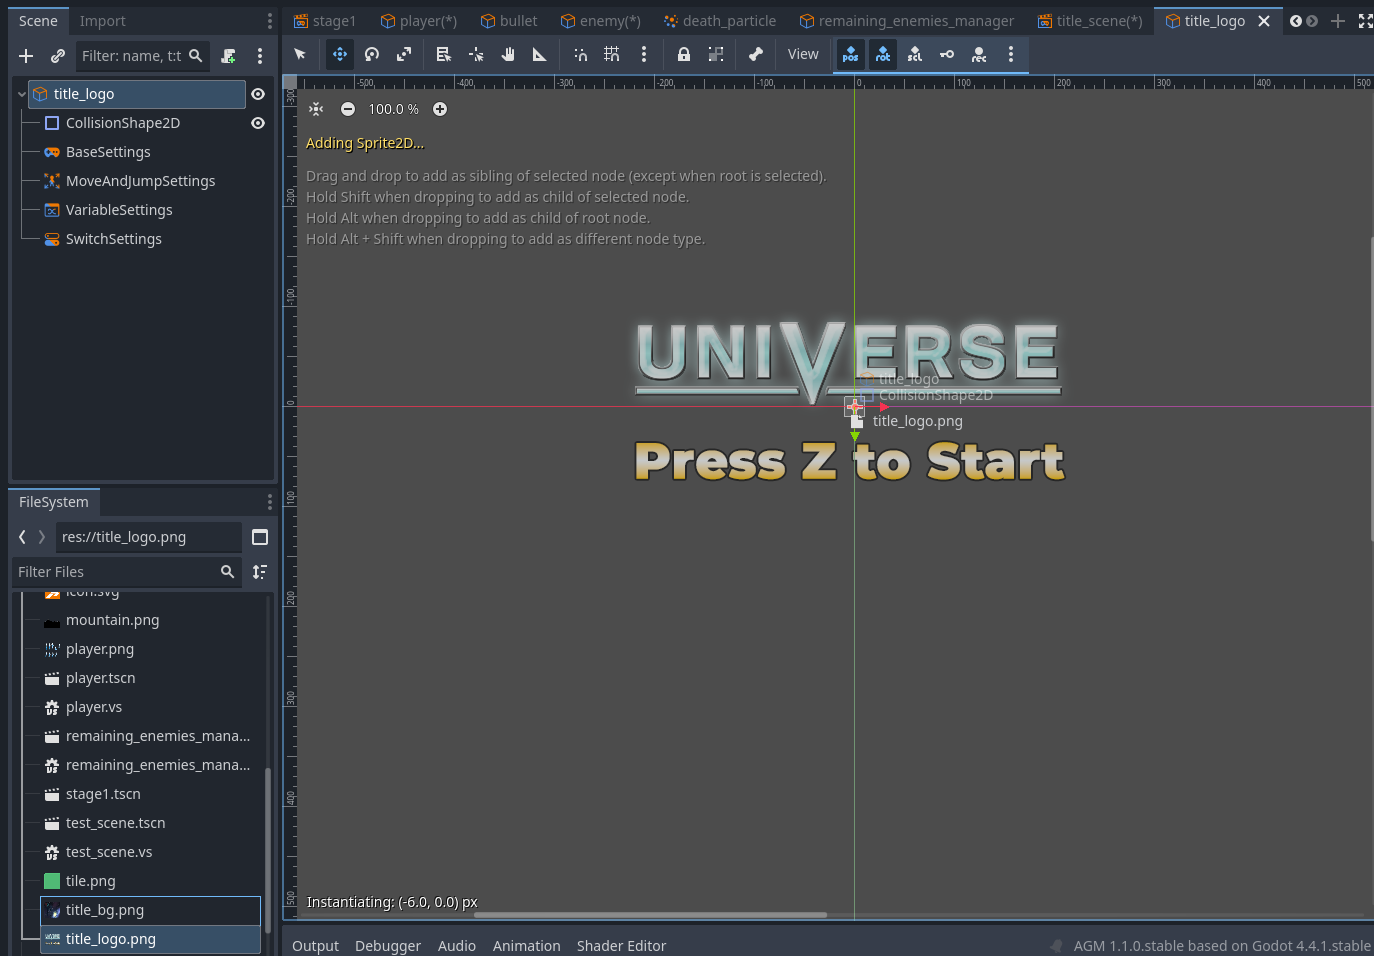
  1. Right-click and save the title logo image below to your local machine.

  2. Drag title_logo.png into the editor’s FileSystem to import it.

  3. From the FileSystem, drag title_logo.png into the editor view.

    • A Sprite2D node will be automatically created, and the texture will be set automatically.


Add a Visual Script to the Title Logo

The object’s function is simple:
It only needs to play the BGM in the title screen, so we only need one state + one executable action.

  1. In the Scene panel, select the title_logo (GameObject) node.

  2. Click :scroll:+ (Attach Script).

  3. Keep the default filename and click Create.

  4. Rename the default State001 to Title.

  5. Click + Add Executable Action.

  6. Select Play Audio.

  7. In Audio Data, choose bgm_title (bgm_title.ogg), then click Add.

    • This way, when the title screen loads, the title BGM will automatically start playing.

Add title_logo to the Title Scene (title_scene)

  1. Switch to the title_scene scene tab and set the editor mode to 2D.

  2. In the Scene panel, select the TitleBG node under the UI layer.

  3. From the FileSystem, drag title_logo.tscn into the scene to place it.

  4. If you don’t see the title logo, it may be obscured by the background.

    • Check in the Scene tree:
      • title_logo is a child node of the UI layer
      • And it is below TitleBG (displayed in front)

    The structure should resemble the reference image.

Scene Transition Setup from Title Screen to Stage1

Now, let’s set up the scene transition from the title screen to stage1.

The Scene Transition Editor works very similarly to the Visual Script Editor.

The overall process is as follows:

  1. Load title_scene.tscn into the Scene Transition Editor
  2. Set title_scene.tscn as the starting scene
  3. Define the transition condition from title_scene.tscn → stage1.tscn
  4. Set the transition effects

Step-by-Step Instructions

  1. Switch the tab at the top of the editor from 2D to SceneTransition.

    image

  2. In the Visual Script-like editing area, drag title_scene.tscn from the FileSystem into the workspace.

  3. Right-click on title_scene, and in the menu, select Set Start Scene (Set as Start Scene).

  4. Next, add a link (Link):

    • Right-click on title_scene
    • Select Add Link
    • Connect the link to stage1
  5. In the Inspector, expand Switching Conditions (Transition Conditions).

  6. Check Trigger On Input (Trigger on Input).

  7. In the Input Operation List:

    • Click + Add Input
    • Select
    • Then select New Input Condition

  8. Expand the newly created Input Condition and set the following:

    • Input Key: Jump
    • Input Condition: Moment Pressed (Pressed Momentarily)


Before the Switch Effects

  1. Expand Before the Switch Effects.

  2. Set the following parameters:

    • Transition Type: Slide_Up
    • BGM Setting: Stop
    • Is Fade Out: On
    • Play SE: On
    • SE: se_enemy_damage (se_enemy_damage.ogg)

    After this setup, when the scene transition begins:

    • The title screen will slide upward
    • The “enemy damage” SE will play once
    • The current BGM will fade out and stop

After the Switch Effects

  1. Expand After the Switch Effects.

  2. Set Transition Type to Slide Down.

    • This causes stage1 to slide down from the top, creating a smooth visual transition that complements the title screen sliding up.


Test the Scene Transition

Run the project (Run Project / F5).

If the setup is correct:

  • The game will start from the title screen
  • Press the Z key (Jump)
  • The transition animation will play, and the game will enter stage1

:white_check_mark: Troubleshooting Common Issues

  • Game starts directly in Stage1
    → Make sure the start scene is correctly set to title_scene, and that you are running the project using Run Project (F5).

  • No response when pressing the key, unable to switch scenes
    → Double-check:

    • Whether the Link from title_scene → stage1 exists
    • Whether the input condition is set to Jump / Moment Pressed

Exporting the Game

At this point, the game is complete.

So far, we’ve only been able to test and play the game using ACTION GAME MAKER, which means only people who have installed ACTION GAME MAKER can run it.

However, by using the Export feature, we can export the game as a standalone executable, allowing anyone to play it directly.

This time, we’ll use Windows PC as an example for the export process.


Exporting the Game

  1. In the menu bar, select Project → Export.

  2. The Export window will open. Click the Add button and select Windows Desktop.
    (This example shows 6 export platforms, but as of ACTION GAME MAKER v1.1.0, the officially supported platforms are only Android / Web / Windows Desktop.)

  3. Next, specify the export path.
    By default, the build files are generated directly in res://, which mixes them with project resources.
    Therefore, we’ll first create a separate folder.

    Click the :page_with_curl: icon on the right side of the export path.

  4. This will open the project folder (the same one seen in the FileSystem).
    Right-click in the blank area and select New Folder (Create New Folder).

    Note:
    In fact, the export path can also be set outside the project folder.
    For simplicity in this tutorial, we’re placing it inside the project; in actual development, you can choose a more suitable location as needed.

  5. Name the newly created folder export, then click OK.

  6. Inside the export folder, save the file as tutorial.
    (This will be the name of the final executable.)

  7. Confirm that the export path is now displayed as: res://export/tutorial.exe

  8. Next, set the export options.
    Set Export Console Wrapper to No.
    (This option determines whether a debugging console window appears when launching the game.)

  9. Click the Export Project button.

  10. A save window will appear, showing the same path and filename as previously set. Simply click Save.

  11. The interface will display a progress bar labeled “Packing…”. Please wait until the export is complete.

  12. After the export finishes, you may see the following warning message:

This occurs because the tool rcedit, used to set metadata for the executable (such as icons, author name, etc.), failed to run.
Since we haven’t configured these items in this tutorial, this warning can be completely ignored.

In the output log, you might also see an error message like this:

ERROR: Could not create child process: rcedit export/tutorial.exe --set-icon ...

This can also be ignored and will not affect the game’s functionality.


Testing the Exported Game

  1. Close the Export window.

  2. In the FileSystem, right-click the export folder and select Open in File Manager.

  3. Windows File Explorer will open, and you should see two files:

    • tutorial.exe
      → The game executable (main file)

    • tutorial.pck
      → The game resource data package

  4. Double-click tutorial.exe to launch the game.
    A window titled Tutorial (DEBUG) will appear, and you can now play the game directly.


Now, your game can run independently on any Windows PC, without requiring ACTION GAME MAKER to be installed.

If you want to share the game with others, simply distribute the following two files:

  • tutorial.exe
  • tutorial.pck

Conclusion

You did it — you’re now a game developer!

This might be a small game, but you’ve successfully completed a full game project from scratch.

Congratulations! :tada:

Of course, you can continue adding more content, such as:

  • Double jump
  • Wall jump
  • Slide
  • Charge shot
  • Weapon switching
  • Boss battle…

Even just within this game, there are countless ideas you could try.

And right now, you might already be thinking: Should I try making a completely different type of game?

From this point forward, it’s your turn to create what you truly want to make.

During the process, you might sometimes feel stuck or frustrated, but through this tutorial, you’ve already mastered the fundamentals of game development and the core thinking behind ACTION GAME MAKER.

With the knowledge you now have, combined with a bit of imagination, you can create all kinds of games.

As long as you can think:

“What if I combine this action with this condition? Maybe it could work…”

Then you’re already on the right path.

If one day you feel lost or can’t think of new ideas, try searching related topics on the RPG Maker Guild, or ask questions in the official Discord community.

You can use the search bar at the top right of the RPG Maker Guild page to find content.

Official Discord Community (for discussion & questions):
:link: ACTION GAME MAKER OFFICIAL