[MZ][Visustella Item&Equip Core] ショップステータスウィンドウの編集

みなさん、こんにちは!初めて投稿する者ですが、長らく(旧フォーラムも含めて)閲覧のみで伺っておりました。

Visustellaのコアプラグインを愛用していますが、ショップや装備ストア周りで他のプラグインよりも多くのトラブルに見舞われています。そこで、私が抱えている問題を箇条書きでまとめました:

- カスタムパラメータを4つ追加しています。表示されるのは「compare」データスタイルを使用した場合のみです。

- 素晴らしいですね?しかし、問題は現在戦闘中のメンバーしか表示されない点です。これは使い勝手が悪いです。なぜなら、最終的には多くの操作可能なキャラクターが登場する予定だからです。

- 理想的には、選択された武器タイプを使用可能な操作可能なキャラクター(パーティーメンバー)(戦闘中のメンバーかどうかに関わらず)のみを表示し、表示されるキャラクターの最大数を5〜6人に拡張したいです。
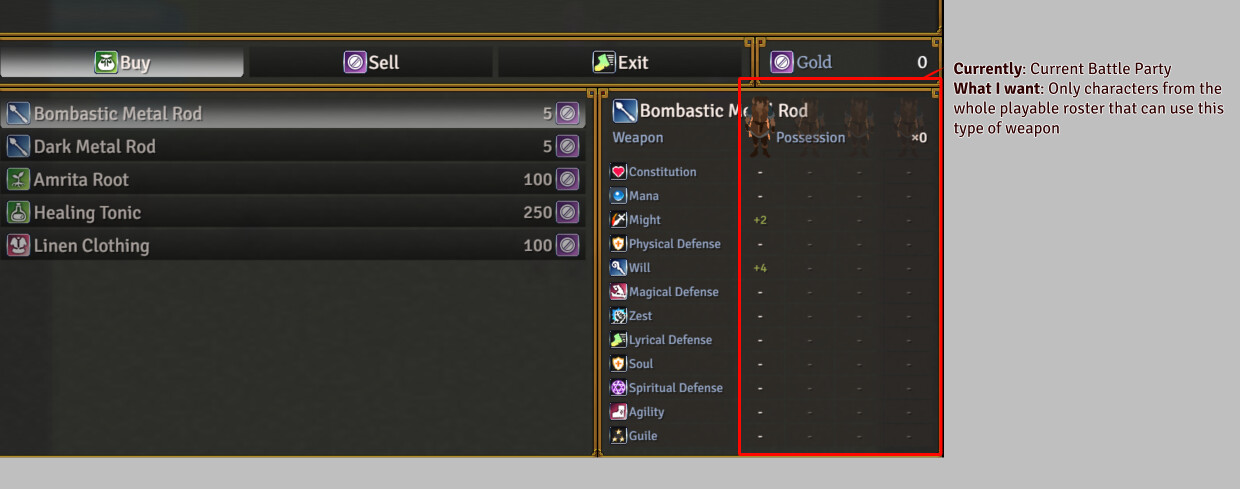
「actor.canEquip(this._item)」が関係していると思われますが、私には手が出ないレベルです!

以下は、JSの「Draw Equip Data」の編集前のコードです:

// 変数の設定

const lineHeight = this.lineHeight();

const paramheight = this.gaugeLineHeight() + 8;

let x = 0;

let y = 0;

let width = this.innerWidth;

let height = this.innerHeight;

let hw = Math.floor(width / 2);

let hx = x + width - hw;

// アイテム名、タイプ、数量の描画

this.drawItemName(this._item, x + this.itemPadding(), y, width - this.itemPadding() * 2);

this.drawItemDarkRect(x, y, width);

y += lineHeight;

if (this.drawItemEquipType(x, y, hw)) y += 0;

if (this.drawItemQuantity(hx, y, hw)) y += lineHeight;

// パラメータ名の描画

const params = this.actorParams();

const backY = y;

y = height - (params.length * paramheight) - 4;

let paramX = x;

let paramWidth = 0;

let tableY = y;

for (const paramId of params) {

paramWidth = Math.max(this.drawParamName(paramId, x + 4, y + 4, width), paramWidth);

y += paramheight;

}

// アクターデータの描画

const actorMax = $gameParty.maxBattleMembers();

const actorWidth = Math.floor((width - paramWidth) / actorMax);

paramWidth = width - (actorWidth * actorMax);

for (const actor of $gameParty.battleMembers()) {

const index = $gameParty.battleMembers().indexOf(actor);

const actorX = paramX + paramWidth + (index * actorWidth);

this.changePaintOpacity(actor.canEquip(this._item));

this.drawActorCharacter(actor, actorX + (actorWidth / 2), tableY);

let actorY = tableY;

// パラメータ変更の描画

for (const paramId of params) {

const diffY = actorY - ((lineHeight - paramheight) / 2);

this.drawActorParamDifference(actor, paramId, actorX, diffY, actorWidth);

actorY += paramheight;

}

}

// 背景の四角形の描画

this.drawItemDarkRect(paramX, backY, paramWidth, tableY - backY);

for (let i = 0; i < actorMax; i++) {

const actorX = paramX + paramWidth + (i * actorWidth);

this.drawItemDarkRect(actorX, backY, actorWidth, tableY - backY);

}

for (const paramId of params) {

this.drawItemDarkRect(paramX, tableY, paramWidth, paramheight);

for (let i = 0; i < actorMax; i++) {

const actorX = paramX + paramWidth + (i * actorWidth);

this.drawItemDarkRect(actorX, tableY, actorWidth, paramheight);

}

tableY += paramheight;

}

ご意見や知識をお持ちの方がいらっしゃいましたら、ぜひご教示ください。お時間を割いていただき、ありがとうございます!

canEquip が正しいチェックのように思えますが、問題は上記のループが渡されるのが戦闘メンバーだけであるという制限点です。// Draw Actor Data の下のブロックは $gameParty.battleMembers() からデータを取り出し、maxBattleMembers() を基準に列のサイズを設定しているため、ここを交換する必要があります。その下の部分はすべて actorMax を参照しているので、事前に独自のリストを作成すれば、残りのコードはそれに追随するはずです。

そのセクションの最初の4行を以下のように置き換えてみてください:

// Draw Actor Data
const actorList = $gameParty.allMembers().filter(actor => actor.canEquip(this._item)).slice(0, 6);
const actorMax = Math.max(actorList.length, 1);
const actorWidth = Math.floor((width - paramWidth) / actorMax);
paramWidth = width - (actorWidth * actorMax);
for (const actor of actorList) {
    const index = actorList.indexOf(actor);

this.changePaintOpacity から下は、あなたが記述した通りそのままにしておきます。slice の引数である 6 が列の最大数となり、Math.max によって誰もその武器を使用できない場合にゼロ除算が発生しないようにしています。

allMembers() は予備隊を含むパーティー全体のメンバーを返します。もしパーティーにまだ属していないアクターを指しているのであれば、そのリストは $dataActors から取得することになります。どちらを意図しているか教えていただければ、そのバージョンも作成できます。

一つ気をつけていただきたい点として、そのウィンドウに6列あるということは、各列の幅が4列のときのおよそ3分の1になるため、パラメータの数値や歩行スプライトが重なり合う可能性が出てきます。もしそのようなことが起こる場合は、最大数を5に減らすか、このスクリプト内でフォントを小さくすることで対応できます(これはこのウィンドウにのみ影響します)。

完璧に機能しました!本当にありがとうございます、バズさん!

あなたが書いてくれたコードに加えて、const actorX = paramX + paramWidth + (index * actorWidth); を追加しました。

ゲームで ActorX が定義されていないという問題が発生していましたが、それ以降はすべて完璧に動作しています :partying_face:

今、別の問題に直面しています。これを同じ投稿に追加するのが良いのか、それとも新しい投稿を作成すべきなのか分かりません。後者の場合は、これを編集して削除します。

-何らかの理由で、アクターの歩行スプライトをパーティーメンバーの表現に使用したくありません。そもそも、もっと小さいアイコンのようなものが欲しかったのです。そこで、アクターのニックネームにアイコンを追加しました。

そして、this.drawActorCharacter を this.drawActorNickname に置き換えたところ、ある程度機能します!しかし、歩行スプライトが完璧に中央揃えされていたのに比べて、位置がずれて表示されてしまいます…

最後の「アクターデータ描画」セクションのコードを調整すればできると思いますが、それが可能かどうか確信が持てません。

参考までに、現在のコードは以下の通りです。以前のお手伝いにも本当に感謝しています。もしお手数でなければ、こちらについても正しい方向へ導いていただけると幸いです。

// 変数の設定

const lineHeight = this.lineHeight();

const paramheight = this.gaugeLineHeight() + 8;

let x = 0;

let y = 0;

let width = this.innerWidth;

let height = this.innerHeight;

let hw = Math.floor(width / 2);

let hx = x + width - hw;


// アイテム名、タイプ、数量の描画

this.drawItemName(this._item, x + this.itemPadding(), y, width - this.itemPadding() * 2);

this.drawItemDarkRect(x, y, width);

y += lineHeight;

if (this.drawItemEquipType(x, y, hw)) y += 0;

if (this.drawItemQuantity(hx, y, hw)) y += lineHeight;


// パラメータ名の描画

const params = this.actorParams();

const backY = y;

y = height - (params.length * paramheight) - 4;

let paramX = x;

let paramWidth = 0;

let tableY = y;

for (const paramId of params) {

paramWidth = Math.max(this.drawParamName(paramId, x + 4, y + 4, width), paramWidth);

y += paramheight;

}


// アクターデータの描画

const actorList = $gameParty.allMembers().filter(actor => actor.canEquip(this._item)).slice(0, 6);

const actorMax = Math.max(actorList.length, 1);

const actorWidth = Math.floor((width - paramWidth) / actorMax);

paramWidth = width - (actorWidth * actorMax);

for (const actor of actorList) {

const index = actorList.indexOf(actor);

const actorX = paramX + paramWidth + (index * actorWidth);

this.changePaintOpacity(actor.canEquip(this._item));


this.drawActorNickname(actor, actorX + (actorWidth / 2), tableY);

let actorY = tableY;


// パラメータ変更の描画

for (const paramId of params) {

const diffY = actorY - ((lineHeight - paramheight) / 2);

this.drawActorParamDifference(actor, paramId, actorX, diffY, actorWidth);

actorY += paramheight;

}

}


// 背景の長方形の描画

this.drawItemDarkRect(paramX, backY, paramWidth, tableY - backY);

for (let i = 0; i < actorMax; i++) {

const actorX = paramX + paramWidth + (i * actorWidth);

this.drawItemDarkRect(actorX, backY, actorWidth, tableY - backY);

}

for (const paramId of params) {

this.drawItemDarkRect(paramX, tableY, paramWidth, paramheight);

for (let i = 0; i < actorMax; i++) {

const actorX = paramX + paramWidth + (i * actorWidth);

this.drawItemDarkRect(actorX, tableY, actorWidth, paramheight);

}

tableY += paramheight;

}

同じスレッドで問題ありません。同じウィンドウであり、同じコードブロック内にあるため、後からこれを見つける人にとってすべてが一緒に整理された状態になります。

そして、はい、actorX の行についてのご指摘は正しいです。あれは確かにそこに属していました。

オフセットが発生しているのは、それら2つの描画処理で x の扱いが異なるためです。drawActorCharacter は drawCharacter に処理を委譲しており、渡された x 値を中心にスプライトを配置します。そのため、actorX + (actorWidth / 2) は自動的にちょうど中央に配置されていました。一方、drawActorNickname はテキスト描画であるため、x はテキストボックスの左端を指し、渡していない幅引数は、カラムの幅よりも広いデフォルト値にフォールバックします。

カムの左端に配置する最も簡単なバージョンは以下の通りです:

this.drawActorNickname(actor, actorX, tableY, actorWidth);

実際に中央に配置するには、drawActorNickname には align 引数がないため、テキストの幅を測定して自分でオフセットを調整するのが一般的です:

const nick = actor.nickname();
const nickWidth = this.textSizeEx(nick).width;
this.drawTextEx(nick, actorX + ((actorWidth - nickWidth) / 2), tableY, actorWidth);

drawTextEx はテキストコードも実行するため、ニックフィールドに \I[x] のアイコンが含まれている場合でも、正しく描画されるはずです。

垂直方向の扱いも2つの関数で少し異なります。drawCharacter はスプライトの下端を指定された y 位置に配置しますが、テキスト描画は y 位置から下方向に行われるため、アイコンはスプライトよりも低い位置に配置されます。この tableY の値にわずかに負の値を足すことで、位置を合わせることができます。パラメータ行と見比べて、目で見て調整するのが良いでしょう。

本当にありがとうございます!2番目のコードで完璧に動作しました。

あなたのコードの後、let actorY = tableY; のままにしていますが、tableY の値に対する負の補正(ネッジ)は、あなたのコードの最後の行に適用すべきでしょうか、それともこの別の行に適用すべきでしょうか?また、どのように記述すればよいでしょうか?

本当にありがとうございます。最後に一つだけ質問させてください。「x0」を「Owned」の隣から少し左にずらして、邪魔にならないようにしたいのですが、「Draw Equip Data」のコードでそのようなことは可能でしょうか?少し試行錯誤してみたのですが、うまくいきませんでした。

nudge(位置調整)は let actorY = tableY; ではなく、drawTextEx の行にのみ適用してください。actorY はその下にあるパラメータ行の基準点となるため、これを移動するとすべての値が一緒にずれてしまいます。

つまり、呼び出しの y 引数に設定します:

this.drawTextEx(nick, actorX + ((actorWidth - nickWidth) / 2), tableY - 6, actorWidth);

「6」は最初の推測値です。アイコンが希望する位置に来るまで値を調整してください。

×0(所持数)については、このスクリプトで提供される調整箇所は、以下の行の x 座標と幅だけです:

if (this.drawItemQuantity(hx, y, hw)) y += lineHeight;

渡した幅の中に右寄せで数が描画される場合、幅を狭くすると左に寄ります(「Owned」ラベルはそのままの位置に留まります)。hw - 40 を試して、位置がずれるか確認してください。もし全く動かない場合は、その位置がプラグイン内部から設定されており、外部から渡した値には依存していない可能性があります。この場合、この設定ボックスからは変更できません。これは答えというよりはテスト用の提案であり、VisuStella が具体的にどのように描画しているかは確信が持てません。

すべてが完璧に動作しました!

そのテーブルのYで-43、ハードウェアで-60に設定したのが決め手でした。

答えを教えてくれただけでなく、すべてを詳しく説明してくださったバズさん、本当に本当にありがとうございます! :star_struck:

どういたしまして!