Overview
This manual serves as an explanatory guide for the “Shader & HDR Sample” project bundled with ACTION GAME MAKER.
About the Shader & HDR Sample
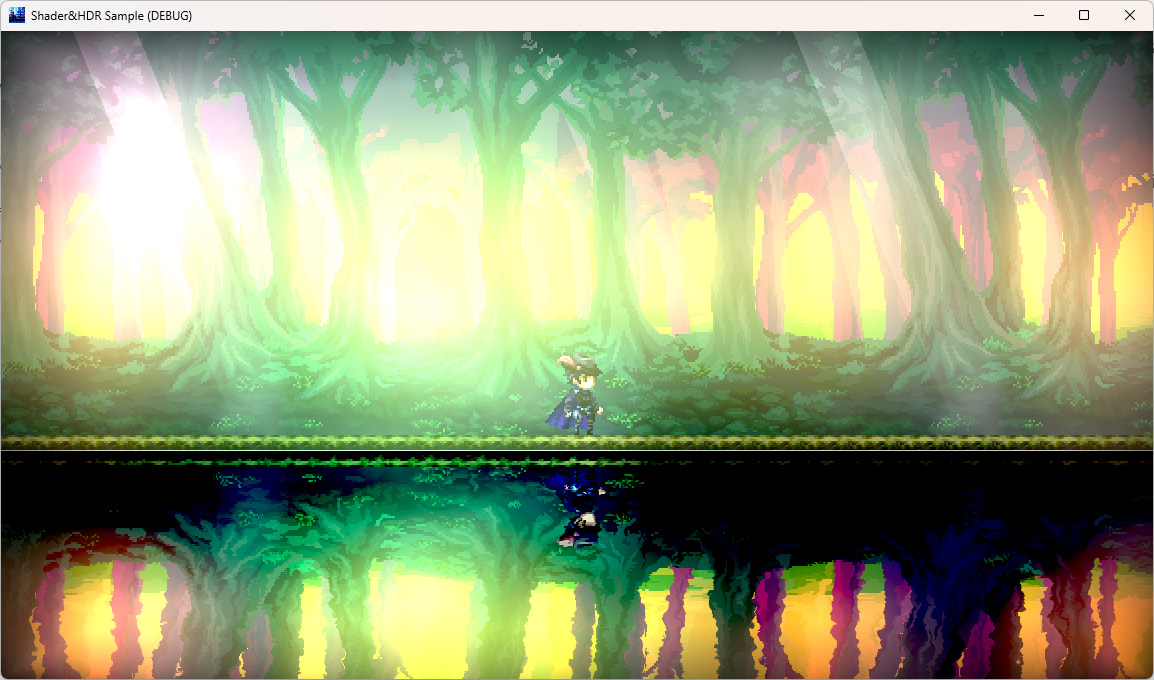
This sample project demonstrates the kind of visual expressions you can achieve by combining Godot Engine’s “HDR 2D,” “Shader,” and “WorldEnvironment” features.
The two images below use the exact same sample assets.
ON
OFF
Stage Layout of the Shader & HDR Sample
The stage is designed to loop through five different locations—a Mystical Forest, a Scorching Volcanic Cave, a Frozen Snowfield, a Radiant Grassland, and a Rainy Neon City—alternating between Shader ON and OFF states for each.
Playtest Controls
- Left / Right Arrow Keys: Move
- Z Key: Jump
Technical Explanation
Quick Glossary
- HDR 2D (High Dynamic Range 2D)
HDR is a technology that represents whites and blacks across a much wider color gamut than usual. In other words, it allows for more realistic, high-precision, photo-like brightness and darkness. However, please note that you won’t get the full effect unless you are using a display and graphics card that support HDR. - Shader
A shader is a program used to modulate, deform, or distort graphics to render special effects in real-time, such as “glowing light,” “water,” or “screen distortion.” While it does require programming in a specific shader language, it enables incredibly advanced visual expressions.
The filters, screen effects, and water nodes in ACTION GAME MAKER are also powered by these shaders. - WorldEnvironment
Like shaders, the WorldEnvironment node generates special effects, but it affects the entire scene. True to its name, it defines the environment of your “world.” In 2D games, it is most commonly used for Glow (an effect where bright areas bleed or bloom into the surrounding pixels).
How This Sample Stage Was Built
The workflow for creating this stage is as follows:
- Go to Project Settings > General > Rendering > Viewport and enable HDR 2D. (You only need to do this once per project)
- Add a WorldEnvironment node to configure lighting adjustments and Glow settings.
- Adjust the brightness of individual images using the RAW option in their modulation settings.
- If the screen becomes too bright, use CanvasModulate to darken it back down.
- Apply screen effects using shaders and particles.
Next, let’s look at the specific settings applied to each location.
Configuration Details for Each Location
Mystical Forest (scene1_forest.tscn)
WorldEnvironment Settings
- Background > Mode: Canvas (For 2D games, you can pretty much always just set this to Canvas without overthinking it)
- Glow > Levels: Controls the intensity of the brightness, while Bloom determines how wide the bleeding effect spreads. The blend mode was changed to Mix because the default Add made things too bright.
- Adjustments: To create a mystical atmosphere, the contrast was boosted to emphasize light and shadow, while the Saturation was dialed down.
Sprite Modulation
To give the forest an eerie vibe, the colors were adjusted node by node, and certain RAW values were set to 2.
When HDR is OFF, RAW values cannot exceed 1.0. However, when HDR is ON, you can crank them past 1.0. Essentially, anything above 1.0 is brighter than the standard maximum brightness.
The WorldEnvironment is set up so that any node with a RAW value exceeding 1.0 will emit a glow.
CanvasModulate Settings
Setting the RAW value above 1.0 to get that nice bloom has a side effect: the screen gets way too bright. To fix this, the CanvasModulate is used to dim the screen slightly. Because CanvasModulate applies after the bloom effect, it allows us to keep the glowing bloom while maintaining a dark atmosphere.
Shader Settings
- Godray: Simulates beams of sunlight filtering through the forest canopy.
- Shader_Fog: Renders a misty fog layer.
- Shader_Vignette: Applies a vignette effect. By darkening the four corners of the screen, it gives the scene a classic, cinematic film look.
Scorching Volcanic Cave (scene2_volcano)
WorldEnvironment Settings
- Background > Mode: Canvas
- Ambient Light: To match the volcanic cave theme, the ambient color is set to a dark red tint, and the energy (brightness) is kept quite low.
- Tonemap: Left at default in the forest, but changed to ACES here. ACES delivers a much more intense, vibrant brilliance, making it perfect for darker maps.
- Glow > Levels: The brightness is pushed very high, and the blend mode is set to Add for an intensely blinding glow. This brightness is contrasted later by using CanvasModulate to darken the overall scene.
Sprite Modulation
The background elements are given an intensely bright RAW value of around 4.
CanvasModulate Settings
Because the map would otherwise be blindingly bright, the CanvasModulate color is set to a very dark scheme: Red at 0.4 and everything else below 0.2. A light source is attached to the player so they remain visible, but without it, the map would be pitch black.
Shader / Particle Settings
- Shader_Vignette: Adds a vignette effect, just like in the forest.
- Heat_Noise: Simulates a heat haze effect that warps and distorts the screen.
- Shadow_Gradation: Applies a gradient that darkens towards the top of the screen to sell the feeling of being deep inside a cave.
- Sparkle_particle: A particle system that sends embers floating up from the ground.
Frozen Snowfield (scene3_snow)
WorldEnvironment Settings
- Background > Mode: Canvas
- Ambient Light: Set to blue to fit the snowfield environment, with a slightly lower energy value of 0.5.
- Tonemap: Changed to ACES. The Exposure (camera aperture) is bumped up to 1.2 to give the scene a bright, punchy look.
- Glow > Levels: The Bloom is turned up slightly to mimic light reflecting off snow. The HDR Threshold is set to 1.1 so that standard whites (like plain snow texturing) don’t accidentally start glowing.
Sprite Modulation
The background isn’t modulated this time. Instead, the TileMap’s brightness is cranked up to 1.3 to make the snowfield look like it’s glistening under the light.
CanvasModulate Settings
The original map had a strong purple undertone, so the red channel was dialed back to shift the overall color palette toward a crisp blue.
Shader / Particle Settings
- Shader_Vignette: This uses the exact same vignette shader as the forest and volcano scenes, but the color was changed to white to make it look like the edges of a camera lens are freezing over.
- Snow_particle: Renders falling snow using particles. (Fun fact: this is actually just the volcano’s ember particle system with a few tweaks!)
Radiant Grassland (scene4_grassland)
WorldEnvironment Settings
- Background > Mode: Canvas
- Ambient Light: Set to orange to evoke a warm, late-afternoon sunset vibe.
- Tonemap: Set to ACES to make the grass shimmer radiantly.
- Glow > Levels: The Bloom is dialed up to capture the sun’s glare reflecting off the fields.
Light Settings
Two lights were added to simulate realistic sunlight:
- DirectionalSunLight2D: Acts as the primary source of global sunlight.
- PointSunlight2D: A massive light source placed in the upper right corner of the screen. It is positioned to intentionally create a slight “lens flare/backlight” effect as the player advances through the stage.
Sprite Modulation
Because the sunlight makes everything bright by default, the background sprites have all been modulated to be darker. Conversely, only the grass (BaseDecoration) has its value boosted to 1.2, making it bleed and bloom beautifully under the sunlight.
CanvasModulate Settings
Not used in this map.
Shader / Particle Settings
- grass_windshader (on BaseDecoration): Applied directly to the TileMap to make the grass sway in the wind. This showcases how shaders can be assigned to tile layers, not just standalone sprites.
- Fluff_Particle: A particle effect that simulates dandelion fluff floating gently through the breeze.
Rainy Neon City (scene5_city)
WorldEnvironment Settings
- Background > Mode: Canvas (For 2D games, you can pretty much always just set this to Canvas without overthinking it)
- Ambient Light: A subtle purple light was introduced to capture that classic neon/cyberpunk aesthetic.
- Tonemap: Set to ACES to make the neon lights pop.
- Glow > Levels: This scene utilizes a feature called GlowMap. Normally, bloom bleeds out using its original color source (e.g., white light bleeds white). When a GlowMap is configured, however, it forces the glow into specific colors. In this setup, dimmer lights bleed blue and brighter lights bleed purple, forcing all blooms into a stylized neon color palette.
Sprite Modulation
There is only one background sprite used here (DistantView), which has its value bumped up to 1.5 to make it brighter. The shops are configured within the Wall TileMap layer under the WallLayer, and these have also been brightened.
CanvasModulate Settings
Not used in this map.
Shader / Particle Settings
- RainDropEffect: Simulates water droplets pooling on the screen by distorting specific parts of the display.
- rain: A particle system that handles the falling rain effect.
- rainsplash: A particle system that displays raindrops splashing as they hit the ground. Since it is configured to spawn particles along a specific flat axis, it might be a bit tricky to implement on maps with uneven terrain.