[Dive Into AGMaker] Using Custom Images as Fonts
Introduction
In AGM, we can use custom character images as fonts. This note will detail the necessary steps. These techniques are applicable to both AGM and native Godot.
Software Version Reference
I am using Action Game Maker 1.0.21.
Preparations
- Prepare a font texture. For convenience, using the order of all visible ASCII characters is best, as it simplifies the subsequent import steps.
- If you don’t need all ASCII characters, ensure you draw the characters you need in continuous ASCII order (also to simplify import), such as drawing numbers 0-9 consecutively.
- Ensure that each character in your material occupies the same size, such as 5x12 or 8x9. There are no specific size restrictions.
- Stitch all characters into a single image and save it in PNG format.
Visible ASCII Characters
This text represents all standard visible ASCII characters in their order, starting from the space character to the tilde ~.
!"#$%&'()*+,-./0123456789:;<=>?@ABCDEFGHIJKLMNOPQRSTUVWXYZ[\]^_`abcdefghijklmnopqrstuvwxyz{|}~
Example Image
As an example, here is a sample image. The image is from gnsh and is licensed under CC0. Thanks to gnsh for sharing the image.

Example Project
For reference, I will upload my completed demonstration project files here.
sample_painting_custom_font.zip (94.0 KB)
Steps
-
Create a new blank AGM project and drag the image into the AGM file system.
-
Select the image, then click the
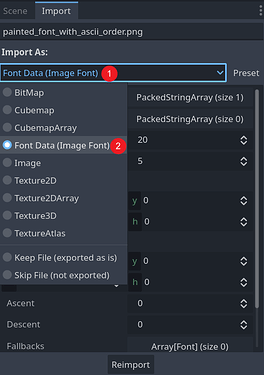
Importtab to the right of theScenetab. In the import dropdown menu, change it toFont Data(Image Font). -
Then slightly modify the parameters in areas 1-5 in the image below, and press the re-import button at position 6. After completing the import, this PNG image will be recognized as a font file and can be used anywhere a font is needed.
-
- Indicate the range of characters to import. If you are using a standard full ASCII character material image (like our example image), fill in
' '-'~'. If only numbers, fill in'0'-'9'.
- Indicate the range of characters to import. If you are using a standard full ASCII character material image (like our example image), fill in
-
- Count how many columns your image has and fill it in here. Our example has 20 columns.
-
- Count how many rows your image has and fill it in here. Our example has 5 rows.
-
- Disable the compression option.
-
- (Optional) I chose integer scaling (usually better for pixel fonts), but you can leave this option unchanged.
-
- After adjusting the parameters, click the re-import button. A confirmation window may pop up; confirm it and continue.
-
-
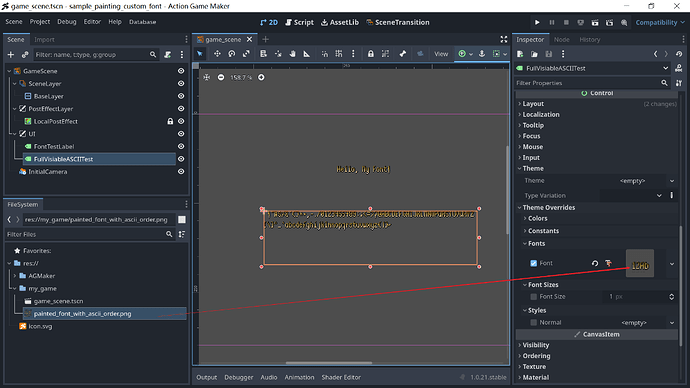
Now everything is ready. Drag this PNG file into any place that originally uses a font, and it will automatically be set up. The example in the screenshot customizes the font setting for a Label node.


