第1章:Godot Engine と ACTION GAME MAKER について学ぶ
はじめに
このチュートリアルは、ゲーム開発の知識もプログラミングスキルも持たない方でも、本格的なゲームを作成したいという方のために設計されています。一歩一歩、ACTION GAME MAKER を使ってゲームを構築する方法を、基礎から学んでいきます。
第1章では、実際にゲーム開発を始める前に、いくつかの重要な基礎知識を学びます。
-
ツールとしての ACTION GAME MAKER とは具体的に何でしょうか?
-
その基盤となっている Godot Engine はどのようなエンジンでしょうか?
-
Godot Engine の基本的な機能の使い方はどうでしょうか?
「いいね!」 1
アクションゲームメーカーとGodot Engine
アクションゲームメーカーとは?
アクションゲームメーカーは、UnityやUnrealなど「ゲーム開発ソフトウェアツール」としてよく知られる主要な「ゲームエンジン」の一つであるGodot Engineをカスタマイズしたバージョンです。
プログラミングの知識が全くない方でもゲームを作成できるように特別に調整されています。
Godot Engineとは?何ができるのか?
Godot Engineは、近年急速に人気を博しているゲームエンジンです。
汎用ゲームエンジンとして、UnityやUnreal Engineに匹敵する幅広い強力な機能を備え、あらゆるジャンルのゲーム制作が可能です。
Godotを使えば、PCゲームだけでなく、スマートフォンゲームやNintendo Switchなどのプラットフォーム向けタイトルも作成できます。すでにどのようなゲームが作られているか確認するには、以下の公式ショーケースをご覧ください。
 公式ショーケース
Godot Engineは、事実上あらゆる種類のゲームを作成できる非常に多用途なツールですが、通常、使用するにはプログラミングの知識が不可欠です。
そこで登場するのがアクションゲームメーカーです。ビジュアルスクリプティングシステムを提供することで、プログラミングの背景がないユーザーでもGodot Engineの機能を最大限に活用できます。
Godotの2D機能がすべて利用可能なので、アクションゲームメーカーでも公式ショーケースで紹介されているようなレベルの2Dゲームを作成できます。
ビジュアルスクリプティングでどのようなゲームが作れるのか?
「Godotは強力なエンジンだが、ビジュアルスクリプティングでは、実際のプログラミングに比べて作れるゲームの種類が制限されないだろうか?」と疑問に思うかもしれません。
アクションゲームメーカーのビジュアルスクリプティングシステムは、前作のアクションゲームメーカーMVから継承されています。その柔軟性により、プラットフォームゲームだけでなく、シューティングゲーム、格闘ゲーム、パズル、RPGなど、多くのジャンルでゲームが制作されてきました。
実際、前作のシステムで作られた60タイトル以上がNintendo Switch™でリリースされています。
ショーケース動画を見る
アクションゲームメーカーは、この実績のあるビジュアルスクリプティングシステムをAction Game Maker MVから継承し、Godotの高度な機能を強化した上で構築されています。
「いいね!」 1
まず、Godot Engine に慣れましょう
ACTION GAME MAKER を使う前に、まず Godot Engine の基本を実際に触ってみましょう。ACTION GAME MAKER は、追加機能を備えた Godot Engine であるため、基本的な UI は同じで、標準の Godot と同じように操作できます。
新しいプロジェクトの作成
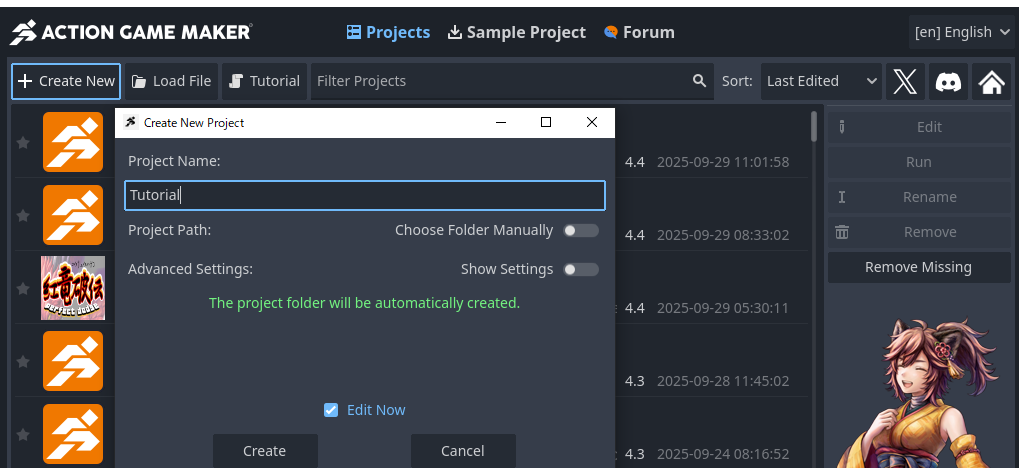
ACTION GAME MAKER を起動すると、Launcher と呼ばれる画面が表示されます。ここでは、プロジェクト を管理します。
「プロジェクト」とは、ゲーム制作のための作業スペースと考えてください。
-
左上の + New Project をクリックします。
-
プロジェクト名を入力します。この例では Tutorial とします。
- 注:プロジェクト名はゲームの名前にもなるため、わかりやすく意味のある名前を選ぶことをおすすめします。
-
Create and Edit ボタンをクリックします。
ここで作成したプロジェクトは、以下のフォルダに保存されます:
UserName\\Documents\\ActionGameMaker\\{ProjectName}
Godot の基本概念:「シーン」と「ノード」
エディタの操作を始める前に、Godot ゲーム開発における2つの基本的な概念、シーン と ノード を学びましょう。
Godot では、シーン を作成し、その中に ノード を配置することでゲームを構築します。
少し抽象的に聞こえるかもしれませんが、テーマパークを例に考えてみましょう:
たとえば、ジェットコースターのアトラクションでは、レールや支柱、コースターの車両などがすべて ノード です。
これらのアトラクション(シーン)を プロジェクト の土地の中に配置していくことで、徐々に完全なテーマパーク(=ゲーム)が完成していきます。
Godot インターフェースのレイアウト
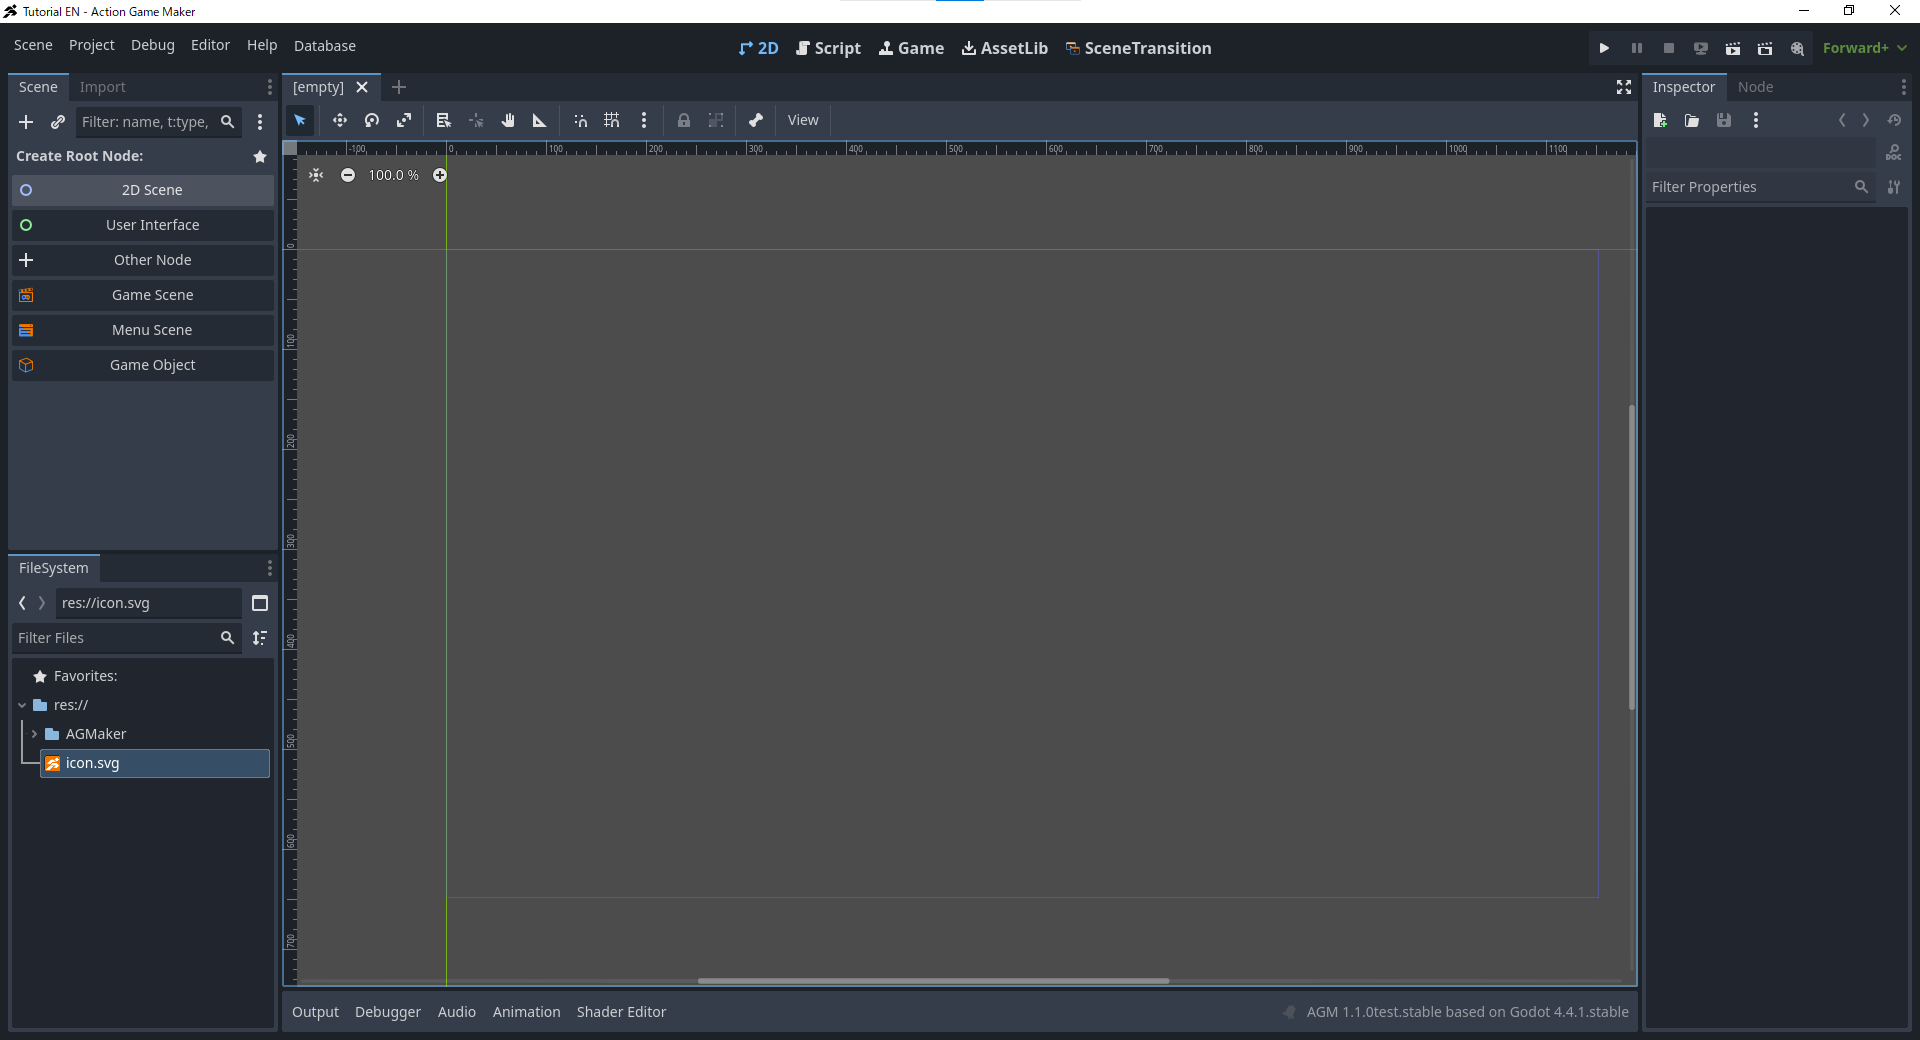
この時点で、以下のような画面が表示されているはずです。これは Godot の基本的なインターフェースであり、したがって ACTION GAME MAKER のインターフェースでもあります。
メインレイアウト
インターフェースは、それぞれ特定の目的を持つ複数の領域に分かれています。
パネルが多く、最初は複雑に感じられるかもしれませんが、Godot のインターフェースはシンプルな原則に基づいて設計されています:
「左で選択、中央で表示、右で調整」
左側パネル
中央パネル
右側パネル
他にもパネルはありますが、まずはこの基本的な概念を覚えておくだけで、理解がずっと楽になります。
では、実際に操作を試してみましょう。
シーンを作成しましょう
まず、シーンのルートノードを作成する必要があります。その名の通り、ルートノードはシーンの基盤(「ルート」)となります。これにより、あなたがこれから作成しようとしているものが何であるか(たとえば、アトラクション、ショップ、またはその他のもの)が決まります。
-
画面の左上にあるルートノードを作成をクリックし、2Dシーンを選択します。
これで、ラベルルートノードを作成がNode2Dに変わります。これがあなたのルートノードです。
Node2Dは2D画面の基盤となるため、これは「私は2Dゲームを作ります」という意思決定を意味します。
シーンの保存
エディタウィンドウの左上には、\**未保存\**と表示されています。単にシーンを作成しただけではまだ保存されていないため、今すぐ保存しましょう。
-
未保存と書かれたタブを右クリックします。
-
メニューから**シーンを名前を付けて保存…**を選択します。
-
ファイルブラウザが表示されます。これはファイルシステムで、プロジェクト内のフォルダとファイルを表示します。
- これは、あなたの遊園地の建設資材がすべて保管されている倉庫のようなものです。
-
デフォルトでは、ファイル名はnode2d.tscnになります。このまま保存すると、後で見つけにくくなる可能性があります。代わりに、名前をtest_scene.tscnに変更して保存してください。
- AGMakerというフォルダが表示されるでしょう。このフォルダはACTION GAME MAKERの内部データ用に予約されているため、選択しないでください。フォルダを選ばずにシーンを保存してください。
-
保存が成功すると、未保存のタブがtest_sceneに変わり、左下のファイルシステムパネルにtest_scene.tscnが表示されます。
シーンにノードを追加する
次に、ノードの扱い方を学びましょう。新しいノードを作成し、ゲームの世界に配置して、カスタマイズします。
まず、シーンに長方形を配置してみましょう。
これは原則の最初のステップに対応します:「左で選択、中央で表示、右で調整」。
長方形の追加(ColorRectノード)
-
シーンに長方形を描画するノードを追加します。
-
シーンパネル(左上)で、**「+」(子ノードを追加)**ボタンをクリックします。
-
上部の検索バーにColorRectと入力し、表示されたノードを選択します。
-
Createボタンをクリックします。
-
中央のエディタウィンドウに白い長方形が表示されます。
シーンのテストプレイ
-
早速、シーンのテストプレイを行いましょう。
-
新しいウィンドウが開きます。
-
表示を確認したら、右上のXボタンでウィンドウを閉じます。
表示されない場合:
エディタビューの操作を試してみましょう
現在、四角形は左上隅に固定されており、見た目が良くありません。エディタビュー(中央のパネル)はシーンのプレビューなので、そこでどのように表示されるかを調整しましょう。
これは原則の**「左側で選択、中央で表示、右側で調整」の「中央で表示する」**ステップに対応しています。
ズームインとズームアウト
-
まず、プレビューのズームインとズームアウトを試してください。
-
エディタビューが選択されている状態で、マウスホイールを回します。
-
前方にスクロールするとズームインし、後方にスクロールするとズームアウトします。
-
現在のズームレベルは、エディタビューの左上隅に表示されます。
プレビューの移動
-
次に、プレビューの位置を移動します。
-
ズームとパンを併用して、青い四角形(ゲーム画面領域)が緑と赤の十字線(この点を原点と呼びます)の周りに綺麗に収まるようにビューを調整します。
- ColorRect ノードによって作成された白い四角形は、現在この青い領域の左上にあり、そのためテストプレイ時にそこに表示されました。
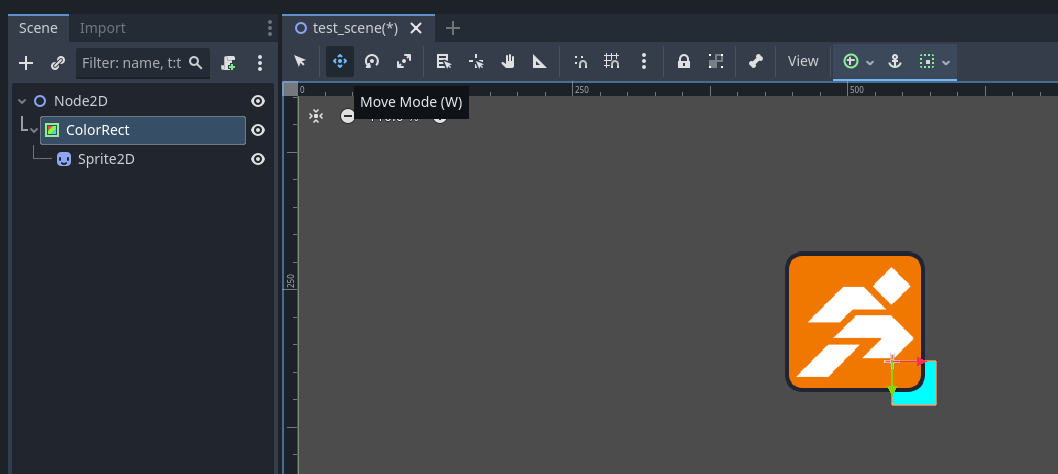
白い四角形の移動
次に、白い四角形をゲーム画面の中央に表示されるように移動させましょう。
-
ColorRect ノードをクリックして選択します。
-
エディタの上部で、移動モード (W) に切り替えます。
-
このモードでは、選択されたノードの位置を移動できます。
-
右上のメニューから現在のシーンを実行 (F6) をクリックして、再度テストプレイを実行します。
-
移動が成功していれば、四角形はゲーム画面の中央付近に表示されるはずです。
インスペクターで白い四角形 (ColorRect) の色を変更する
現在、ColorRect ノードは真っ白です。しかし、その機能の一つとして色を変更することができます。別の色に切り替えてみましょう。
これは、以下の原則の最終ステップに対応しています:
「左側で選択し、中央で表示し、右側で調整する。」
手順
-
左側のシーンパネルで、ColorRect ノードを選択します。
-
右側のインスペクターパネルを確認します。多くの設定項目がリストされています。
- これらの設定は、選択されたノードで利用可能な機能を示しています。
- 各設定はプロパティと呼ばれます。
- 私たちのコースターの例えでは、これらは最大速度やコースター車両の色など、調整できる項目に相当します。
-
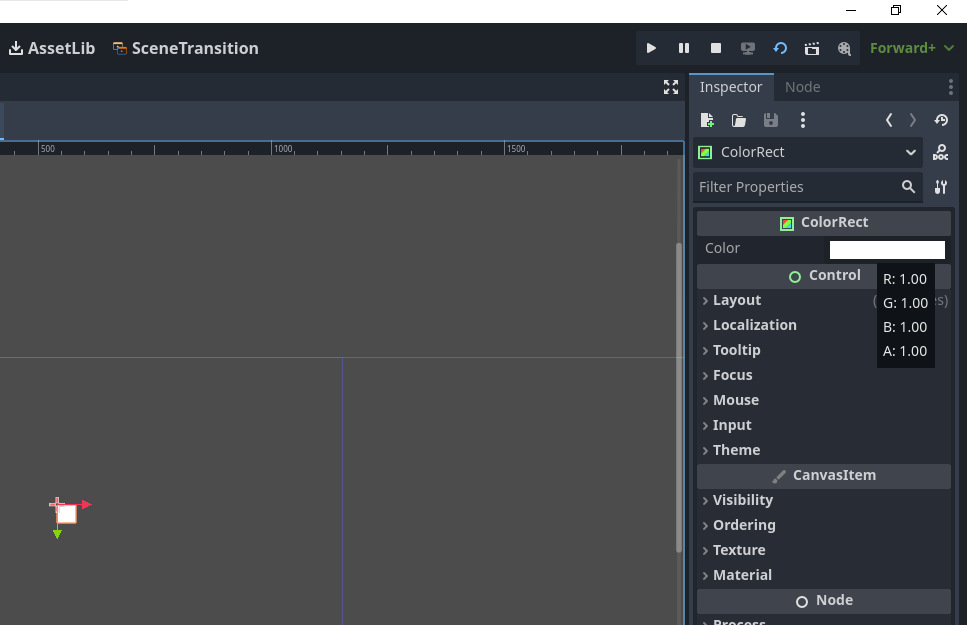
変更するプロパティは簡単に見つかります:一番上にColor(色)があります。
-
色選択ウィンドウが表示されます。色を設定する方法はいくつかありますが、最も簡単なのはデフォルトのRGB モードです。
- RGB は**Red(赤)、Green(緑)、Blue(青)**の略です。
- モニターは、これら3つの色からの光を混ぜることですべての色を生成します。
ヒント: 「3 つの色を混ぜると黒になるのでは?」と思うかもしれません。
-
試しに、R(赤)の値を255 から 0に変更します。
-
このようにして、Godot では右側のインスペクターでノードのプロパティを調整することで、ノードをカスタマイズできます。
シーンに画像を描画するためのノードの追加
次に、ノードの操作についてさらに深く掘り下げていきましょう。
シーンに複数のノードを配置するとどうなるでしょうか?実際に試してみましょう。
今回は単なる長方形ではなく、画像を配置します。そのためには、2D 画像(スプライト)を表示するノードであるSprite2Dを使用します。
Sprite2D ノードの追加
-
左側のシーンパネルでNode2Dを選択します。
-
これは重要です。新しく追加されたノードは、現在選択されているノードの子ノードになるためです。
-
子ノードとは、親ノードに所属するノードのことです。
-
ローラーコースターの例えを使うと、車輪や座席はメインのコースター車(親ノード)に属する小さな部品(子ノード)です。
-
Sprite2D を ColorRect の子にしたくないため、代わりにNode2Dを選択します。
-
Node2Dが選択されている状態で、左上の**「+」(子ノードの追加)**ボタンをクリックします。
-
検索バーにSpriteと入力し、Sprite2Dを選択します。
-
作成ボタンをクリックします。
テクスチャの設定
-
「左側で選択、右側で調整」という原則に従い、シーンパネルでSprite2Dを選択し、右側のインスペクターパネルを確認します。
-
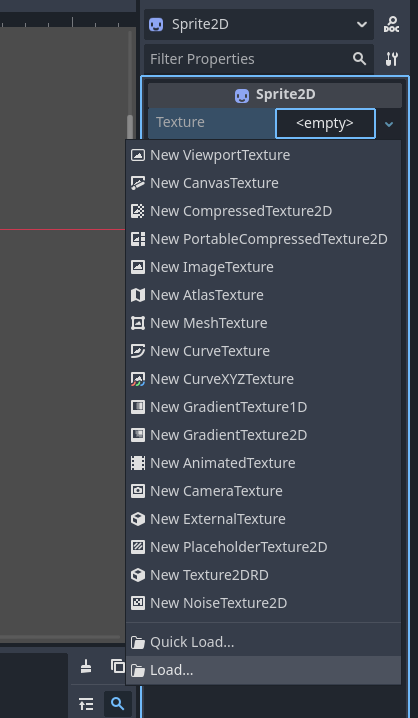
必要なプロパティは一番上にあります:Texture(テクスチャ)。
- テクスチャとは、ゲーム内のオブジェクトに貼り付けるステッカーや模様のようなものです。
-
Texture の隣にある**<空>**と書かれたボックスをクリックします。
-
ファイル選択ウィンドウが開きます。ここには2つの項目が表示されるはずです。
 注意:ここに表示されるものは、左下のファイルシステムパネルに表示されるものと全く同じです。
- test_scene.tscnのようなファイルはここに表示されません。画像ではないため、フィルタリングされているからです。
Godot Engine では、プロジェクトのファイルシステムに保存されたアセットのみを使用できます。
-
今回はicon.svgを選択します。
ノードの描画順序について学ぶ
シーンパネルでSprite2Dを選択します。次に、エディタビューの移動モードを使用して、それを薄い青色の長方形と重なるようにドラッグします。
画像が薄い青色の長方形の上に表示されるはずです。これは、Godotではシーンパネルで下にあるノードが、その上にあるノードよりも手前に描画されるためです。
順序の変更
動作を確認するために順序を変更してみましょう:
-
シーンパネルでSprite2Dをクリックしてドラッグします。
-
ColorRectとNode2Dの間に配置します。
これで、薄い青色の長方形がアイコンの手前に描画されます。
重要なルール
Godotでは:
「シーンパネルでノードが下にあるほど、ゲーム内では手前に表示されます。」
子ノードの概念を学ぶ
以前、子ノードと呼ばれるものについて言及しました。では、これが実際には何を意味するのかを見てみましょう。
今回は、Sprite2DをColorRectの子ノードにします。
ステップ
-
Sprite2Dをクリックしてドラッグし、シーンパネル内のColorRectにドロップします。
-
表示は次のように変更されます。
-
子ノードはシーンパネル内で親ノードの下に表示され、「シーンパネルで下にあるノードは手前に描画される」というルールに従うため、Sprite2Dはシーン内でColorRectの手前に描画されたままです。
-
次に、親ノード(ColorRect)を移動させたときに何が起こるかを確認しましょう。
-
シーンパネルでColorRectノードを選択し、エディタビューで移動モードに切り替えます。
-
すべてが正しく設定されていれば、ColorRectを移動させると、Sprite2Dも一緒に移動します。
-
ノードを子にすることで、それを親の一部としてグループ化し、一緒に操作することができます。この場合は、Sprite2DをColorRectのアクセサリーとして扱います。
「いいね!」 1
第1章の復習
これで、Godotの基本概念と操作を学びました。
第1章では、ノードを作成して操作することで、以下の重要なポイントを学びました:
-
Godotでは、シーンの中にノードを配置してゲームを作成します。
-
インターフェースは「左側で選択、中央で表示、右側で調整」というルールに従います。
-
シーンパネルでは、リストの下部にあるノードがゲーム画面の手前に描画されます。
次に、いよいよスクリプトと呼ばれるものを使って、本格的なゲームのように動きのあるものを作ります。つまり、あなたのアトラクションをプレイ可能にするのです。
しかし、Godot Engineでは、スクリプト作成には通常プログラミングの知識が必要です。プロジェクトを真のゲームとして完成させるためには、基礎からプログラミングを徐々に学ぶ必要があり、それは多くの時間を要します。
でも、心配しないでください!ACTION GAME MAKERのビジュアルスクリプティングシステムを使えば、すぐにゲームの構築を開始できます。プログラミングの事前知識は不要です。
まさにそれこそが、ACTION GAME MAKERが存在する理由です。プログラミングはわからないけれど、Godotでゲームを作りたい人のためにあります。
次の章:第2章
第2章では、ACTION GAME MAKERのビジュアルスクリプトの使い方を学び始めましょう。
詳しくはこちら

")