第5章:プレゼンテーションを強化し、ゲームをエクスポートする
この章では、完成したゲームのプレゼンテーションを磨き上げ、PCでプレイできるようにする方法を解説します。
プレゼンテーションに何が不足しているか考える
ゲームは技術的には完成していますが、画面はまだ少し物足りない印象です。より本格的なゲームらしくするために、何を追加できるでしょうか?
-
まず、背景がないため、背景を追加すると良いでしょう。
-
これは敵を倒すゲームなので、敵が倒された際にプレイヤーの「敗北」エフェクトと同様のエフェクトが表示されるべきです。
-
現在、音がないため、BGMと効果音も追加する必要があります。
-
最後に、タイトル画面があると、ゲームがより完成された製品らしく感じられます。
もちろん、追加できる詳細は他にもありますが、これらの要素を整えるだけで、ゲームはすでに完成品のような印象を与えるはずです。
それでは、作成していきましょう!
パララックス背景の作成
Godot では、Parallax2D ノードを使用してパララックス背景を作成できます。パララックス背景は、カメラに対して近いオブジェクトが速く、遠いオブジェクトが遅く動くことで奥行き感を演出します。これは、スマートフォンのロック画面で見られるような効果で、端末を傾けると背景画像がずれて見える現象と同じです。
ACTION GAME MAKER では、各ゲームシーンのレイヤー(Base / Wall / NearView / MiddleView / DistantView)はすべて Parallax2D で構築されており、これによりパララックス背景を作成できます。
以下の画像を使用します。プロジェクトに読み込んだ後、そのパララックスとループ設定を行います。
手順
-
画像を PC に保存してください。システムの制限により、直接ダウンロードすると自動的に圧縮されるため、保存する前に画像をクリックして拡大してください。
-
保存した mountain.png ファイルを FileSystem にドラッグ&ドロップします。
-
シーンタブを stage1 に切り替え、エディタビューを 2D に変更します。
-
シーンウィンドウで、MiddleView (Parallax2D) レイヤー下の Sprite2D ノードを選択します。
-
インスペクターで、Texture プロパティに mountain.png をドラッグ&ドロップします。
-
シーンウィンドウで、MiddleView (Parallax2D) レイヤー自体を選択します。
-
インスペクターで、Scroll Scale を x=0.7, y=0.7 に設定します。
- これにより、カメラとプレイヤーが距離 1 だけ移動したときに、背景は 0.7 だけ移動し、奥行きが表現されます。
-
次に、インスペクターの Repeat セクションを展開します。
-
以下の値を設定します:
-
Repeat Size: x = 1080
-
Repeat Times: 10
これは、mountain.png(幅 1080px)が横方向に 10 回連続して繰り返されることを意味します。
-
テストプレイを実行します。設定が正しければ、山はプレイヤーよりもゆっくりと動き、奥行き感が表現されます。
トラブルシューティング
敵に死亡エフェクトを追加する
プレイヤーと同じメソッドを使用できます。Vanish状態に「死亡パーティクル」の表示を追加しましょう。
単にパーティクル表示を追加すると、敵がパーティクルが表示されるのと同時に消えてしまい、パーティクルも即座に消えてしまいます。これを防ぐために、Waitアクションを使用して、パーティクルをしばらく表示し続けます。
ただし、ここでは2つの問題を解決する必要があります。
- 「Vanish」アクションが実行されるまで、敵は動き続けます。そのため、敵がまだアクティブで、攻撃判定も有効なように見えてしまいます。
- 敗北シーケンス中に敵の攻撃判定を無効にする必要があります。
最初の問題(移動)について:
問題は「Template Move」がまだ有効になっていることです。「Template Move: Stop」アクションを使用するか、状態内で移動速度を0に設定します。ここでは後者を使用します。
2番目の問題(攻撃判定)について:
攻撃判定を無効にする必要があります。これはChangeObjectPropertyアクションを使用して、AttackCollisionの「Disabled」プロパティを有効にすることで実現できます。「Change Property」アクションを使用すると、インスペクタのプロパティだけでなく、変数やスイッチも変更できます。
設定の手順を見ていきましょう。
「DisplayParticle」を追加する
-
enemyシーンタブを開き、エディタをScriptビューに切り替えます。
-
Vanish状態を選択し、+ Add Executable Actionをクリックします。
-
DisplayParticleを選択します。
-
パーティクルオブジェクトのパスとしてdeath_particle.tscnを選択し、Addをクリックします。
「Wait」を追加する
-
別の実行アクションを追加し、Waitを選択します。
-
パーティクル表示は1秒間続くため、待機時間を1.0秒に設定し、Addをクリックします。
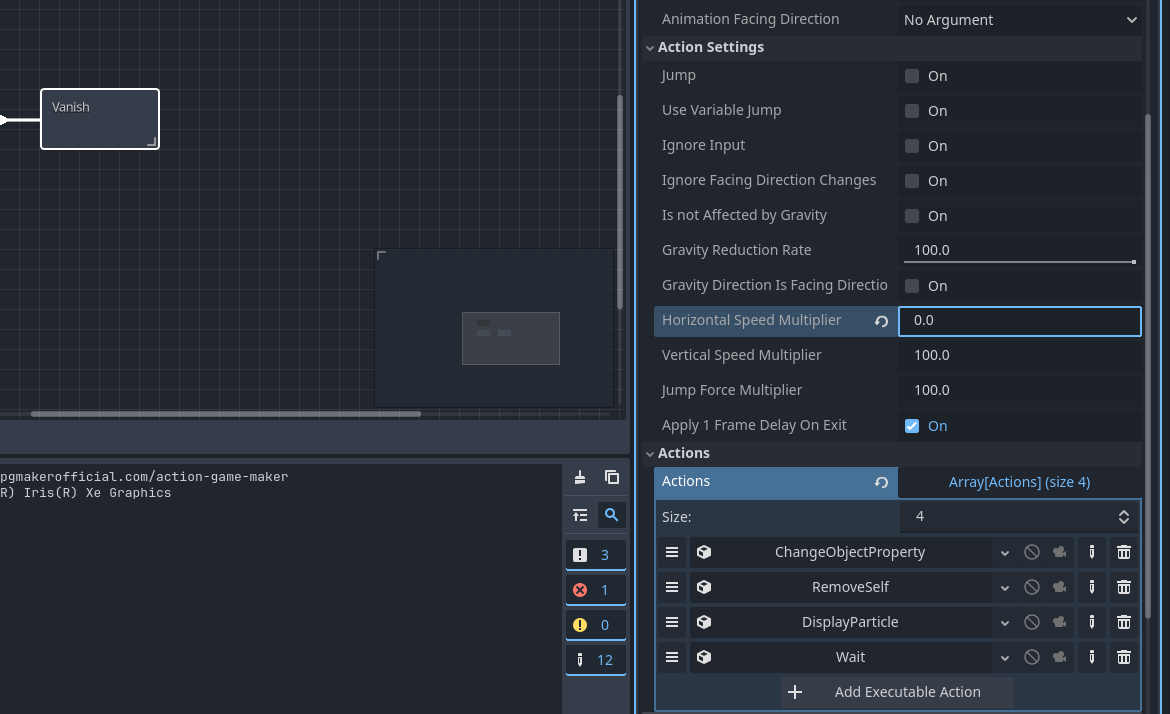
この状態で移動速度を0に設定する
-
InspectorでAction Settingsを展開します。
-
「Horizontal Speed Multiplier」の下で、値を100から0に変更します。
「Change Property」で攻撃判定を無効にする
-
別の実行アクションを追加します。
-
Change Propertyを選択し、以下のように設定します。
-
Target Object Type: Object Property
-
Target Type: Self
-
Target Node Name: AttackCollision
-
Target Object Name: disabled
-
Constant Value: On
これにより、AttackCollisionノードの「Disabled」プロパティが有効になります。
アクションの順序を整える
実行順序が正しいことを確認してください。3本線のアイコンを持つアクションをドラッグして、順序を以下のようにします。
-
DisplayParticle
-
ChangeObjectProperty(衝突を無効化)
-
ChangeObjectProperty(残りの敵数を減らす)
-
Wait
-
RemoveSelf
動作をテストする
テストプレイを実行し、以下を確認します。
トラブルシューティング
サウンドの追加:ACTION GAME MAKER でのオーディオ管理
次に、サウンドシステムを設定しましょう。まず、必要なサウンドが何かを考える必要があります。
BGM(バックグラウンドミュージック) については、少なくとも 2 つのトラックが必要です。
SE(効果音) は、オブジェクトによっていくつか必要です。
- プレイヤー:
- 敵:
- ステージクリア:
- ステージクリア音(「残敵管理」によって処理されます)
合計で、BGM 2 つとSE 7 つになります。
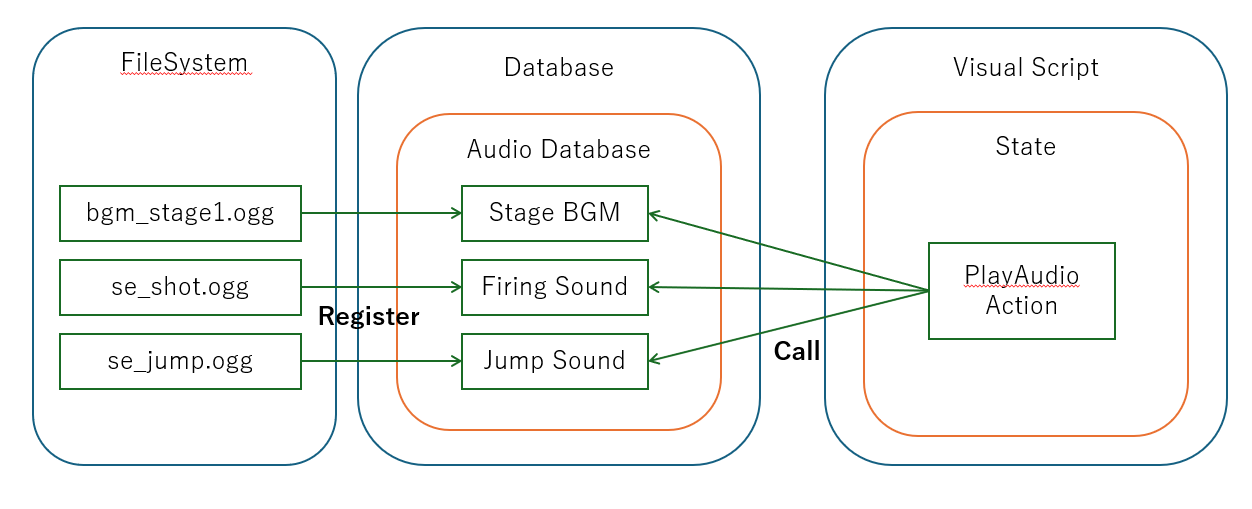
ACTION GAME MAKER におけるサウンド管理
ACTION GAME MAKER では、すべてのサウンドが専用のサウンドデータベースで管理されます。
サウンドデータベースに登録された BGM と SE は、ビジュアルスクリプトの**「PlayAudio」**アクションを使用して再生できます。
したがって、最初のステップは、オーディオファイルをサウンドデータベースに登録することです。
サウンドデータベースへのサウンド登録
準備された2 つの BGMと7 つの SEを含むファイル**sounds.zip**を使用します。
このアーカイブには、フォルダに整理されたすべての必要なサウンドファイルが含まれています。
sounds.zip (1.4 MB)
手順:
-
sounds.zip を PC に保存します。
-
zip ファイルの内容を解凍します。
-
解凍したsoundsフォルダをFileSystemパネルにドラッグ&ドロップします。
-
フォルダ構造が以下のようになっていることを確認します。
res://sounds/
   ├── bgm/
   └── se/

res://sounds/sounds/bgm のように構造が重複している場合は、FileSystem 内のフォルダを移動して、上記の正しい形式に一致させてください。
-
左上隅のDatabaseボタンをクリックします。
-
Data Managementウィンドウで、Audio Databaseタブに切り替えます。
-
bulk setボタンをクリックします。
これにより、フォルダ(res://sounds/bgm および res://sounds/se)が自動的にスキャンされ、9 つのサウンドファイルすべてが登録されます。すべての項目が正しくリストされている場合、設定は完了です。
トラブルシューティング
- サウンドが表示されない場合:
soundsフォルダが res:// の直下に配置されており、他のネストされたフォルダの中に入っていないことを確認してください。
 これで、ビジュアルスクリプトの「PlayAudio」アクションを通じてサウンドを使用できるようになりました。
プレイヤーに SE を追加
まずはプレイヤーから SE(効果音)の設定を始めましょう。各状態に効果音を追加します:ジャンプ、弾発射、被ダメージ、敗北です。
「ジャンプ」状態にサウンドを追加
-
シーンタブをplayerに切り替え、エディタをScriptビューに変更します。
-
Jump状態を選択します。
-
Inspector で + Add Executable Action をクリックします。
-
PlayAudioアクションを選択します。
-
Audio Data ID フィールドで se_player_jump (se_player_jump.ogg) を選択し、Add をクリックします。
-
テストプレイを実行します。正しく設定されていれば、Z キーを押してジャンプする際にジャンプ効果音が再生されます。
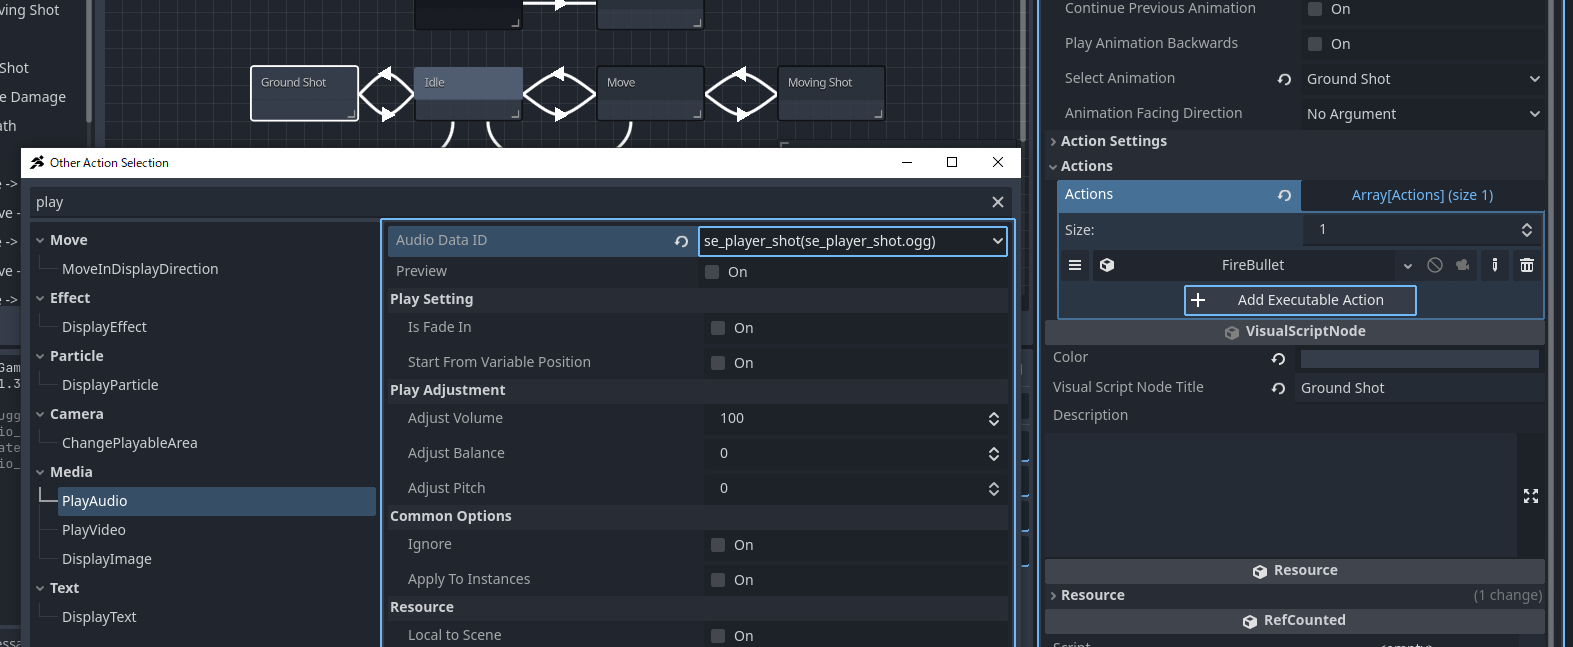
「Play Audio」アクションを「Ground Shot」「Air Shot」「Moving Shot」に追加
次に、弾の発射音を追加します。発射状態が 3 つあるため、それぞれで設定を繰り返します。
-
Ground Shot状態を選択します。
-
Inspector で + Add Execution Action を選択します。
-
Audio Soundを選択します。
-
Sound Data を se_player_shot (se_player_shot.ogg) に設定し、Add をクリックします。
-
他の状態でも同様の処理を繰り返すことができますが、実行アクションはコピー&ペーストも可能です。ここではそれを利用します。
-
追加されたPlayAudioアクションを右クリックし、Copyを選択します。
-
Moving Shot状態を選択します。
-
Inspector で Execution Actions のサイズを1から2に変更します。
-
新しい <empty> スロットが表示されます。それを右クリックし、Pasteを選択します。
-
「PlayAudio」アクションが表示されれば成功です。
-
Air Shot状態を選択し、手順 7–10 を繰り返してアクションをペーストします。
-
テストプレイを実行します。立っているとき、移動中、ジャンプ中にX キーを押して発射すると、同じ発射音が再生されるはずです。
「Damage」状態に「PlayAudio」を追加
次に、被ダメージ状態に音を追加します。手順は同じなので、簡潔に説明します:
-
se_player_damage (se_player_damage.ogg) を Audio Data に設定したPlayAudioアクションを追加します。
-
Damage 状態にはすでにWaitアクションが含まれているため、「Play Sound」アクションを Wait の上にドラッグして、音が即座に再生されるようにします。
-
テストプレイを実行します。プレイヤーが敵に衝突すると、ダメージ音が再生されるはずです。
「Death」状態に「Play Sound」を追加
-
Death状態を選択します。
-
Play Soundアクションを追加し、se_player_down (se_player_down.ogg) を選択します。
-
テストプレイを実行します。プレイヤーが pit に落ちたり、HP が 0 になったりすると、敗北音が再生されるはずです。
これで、プレイヤーのすべての効果音が正しく設定されました。
敵にSEを追加
次に、敵のSEを設定しましょう。
SEには2つの種類があります:ダメージ音と敗北音です。
ただし、プレイヤーとは異なり、敵には専用のDamage状態がありません。
この場合、敵がダメージを受けたときに音を再生するための方法を提供するTakenDamageSettingsノードを使用できます。
TakenDamageSettingsノードでSEを再生
-
シーンタブをenemyに切り替えます。
-
SceneウィンドウでTakenDamageSettingsノードを選択します。
-
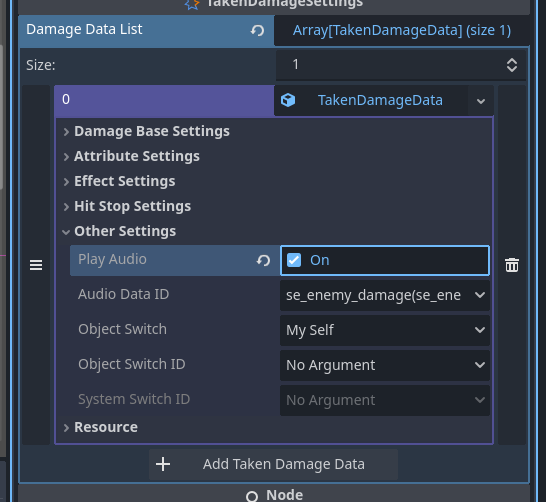
InspectorでDamage Taken Data Listを展開します。
-
+ Add Damage Taken Settingをクリックします。
-
<empty>をクリックしてNew TakenDamageDataを選択します。
-
新しく作成されたTakenDamageDataを展開します。
-
Other Settingsを展開します。
-
Play SoundをOnに設定し、Audio Data IDでse_enemy_damageを選択します。
-
テストプレイを実行します。正しく設定されていれば、敵に弾が当たったときにダメージSEが再生されるはずです。
敵の「Vanish」状態に「Play Sound」を追加
敗北SEについては、プレイヤーと同じようにVanish状態に追加します。
-
Vanish状態を選択します。
-
+ Add Executable Actionをクリックします。
-
PlayAudioを選択し、Sound Dataを**se_enemy_down (se_enemy_down.ogg)**に設定します。
-
PlayAudioがWaitアクションの前に来るようにアクションの順序を並べ替えます。
-
テストプレイを実行します。正しく設定されていれば、敵を倒したときに敗北SEが再生されるはずです。
これで、敵にダメージSEと敗北SEが正しく設定されました。
舞台のBGMとステージクリアSEを設定する
BGMについては、まずインポート設定でループ再生を有効にすることから始めます。その後、舞台BGMを開始する最適な場所は、常に表示される残敵マネージャーオブジェクトの**「カウント」**状態です。
ステージクリアSEについては、同じオブジェクトの**「ステージクリア」**状態で設定できます。
インポート設定でBGMをループさせる
ファイルシステムでリソースを選択した後、シーンタブの隣にあるインポートタブでアセット設定を変更できます。
-
ファイルシステムで sounds/bgm フォルダに移動し、bgm_stage1.ogg を選択します。
-
シーンパネルの上にあるタブをインポートに切り替えます。
-
インポートパネルでループを有効にし、再インポート (*) をクリックします。
-
「アセットを再インポート中」のプログレスバーが完了して消えると、変更が完了します。
-
bgm_title.ogg に対しても手順2〜4を繰り返し、両方のBGMが正しくループするようにします。
「カウント」状態で舞台BGMを再生する
BGMはSEと同様にPlayAudioアクションで再生されるため、手順は以前と同じです。
-
シーンタブを残敵マネージャーに切り替えます。
-
カウント状態を選択します。
-
PlayAudioアクションを追加し、オーディオデータをbgm_stage1に設定します。
-
テスト再生して、ステージ開始時にBGMが再生されることを確認します。
「ステージクリア」状態でステージクリアSEを再生する
-
ステージクリア状態を選択します。
-
PlayAudioアクションを追加し、サウンドデータをse_stageclearに設定します。
-
テスト再生して、すべての敵を倒したときにSEが再生されることを確認します。
何かが動作しない場合のチェックリスト:
-
sounds フォルダが res:// の直下にあることを確認してください(他のフォルダにネストされていないこと)。
-
BGMに対してループ設定が有効になっており、再インポートされたことを確認してください。
-
PlayAudioアクションが正しい状態(BGMは「カウント」、SEは「ステージクリア」)に配置されていることを確認してください。
タイトル画面の設定
これでタイトル画面を作成して設定しましょう。
新しいゲームシーンとして作成し、そこからボタンを押すとstage1へ遷移するようにします。
ACTION GAME MAKER には、これを実現するための専用のSceneTransition機能が用意されています。
では、タイトル画面シーンを作成して設定し、SceneTransition を使用して stage1 に接続しましょう。
タイトル画面の計画
このゲームはシンプルなので、タイトル画面は以下の要素だけで構成されます。
- 背景画像、
- タイトルロゴ、
- 背景で再生されるBGM、
- ジャンプ (Z キー) を押すとstage1へ遷移する。
具体的には、新しいゲームシーンを作成し、UI レイヤー内のSprite2Dを使用して背景を設定し、タイトルロゴの表示と音声再生を行うためのUI ゲームオブジェクトを追加します。
ビジュアルスクリプトと同様に、SceneTransition を使用すると、特定のキー入力によってトリガーされるシーン遷移を設定できます。これを使って、ジャンプキーによる遷移を設定します。
タイトル画面ゲームシーンの作成
-
新しいシーンタブを開く。
-
ルートノードとしてGame Sceneを選択する。
-
すぐにtitle_scene.tscnとしてシーンを保存する。
タイトル画面シーンに背景を追加する
-
準備したタイトル画面用の背景画像を使用する。(右クリックして PC に保存してください。)
-
title_bg.pngを PC からFileSystemにドラッグしてインポートする。
-
シーンパネルでUI レイヤーを選択する。
-
FileSystemからtitle_bg.pngをドラッグし、SHIFTキーを押しながらエディタにドロップする。
- SHIFT キーを押しながらドラッグすることで、画像が選択されたノード(この場合はUI レイヤー)の子として配置されます。
-
背景が UI レイヤーの子として配置されたことを確認する。
- 配置が間違っている場合は、シーンツリー内のTitleBG ノードを正しい位置にドラッグしてください。
-
この背景画像は、カメラのサイズに正確に合わせています:幅1152×高さ648。
- 位置がずれていると、灰色の背景が透けて見えてしまいます。そのため、正確に調整しましょう。
-
TitleBG ノードを選択し、インスペクターのTransformセクションを展開する。
-
Position X = 576, Y = 324を設定する。
- 画像のピボットは中心にあるため、カメラの幅と高さの半分に配置すると、完璧に位置が揃います。
この時点で、タイトル画面の背景がきれいに配置されているはずです。
「タイトルロゴ」ゲームオブジェクトの作成
-
新しいシーンタブを開き、ルートノードの作成の下でゲームオブジェクトを選択します。
-
オブジェクト名を title_logo、テンプレートの使用を UI、タイプを Empty に設定し、作成をクリックします。
-
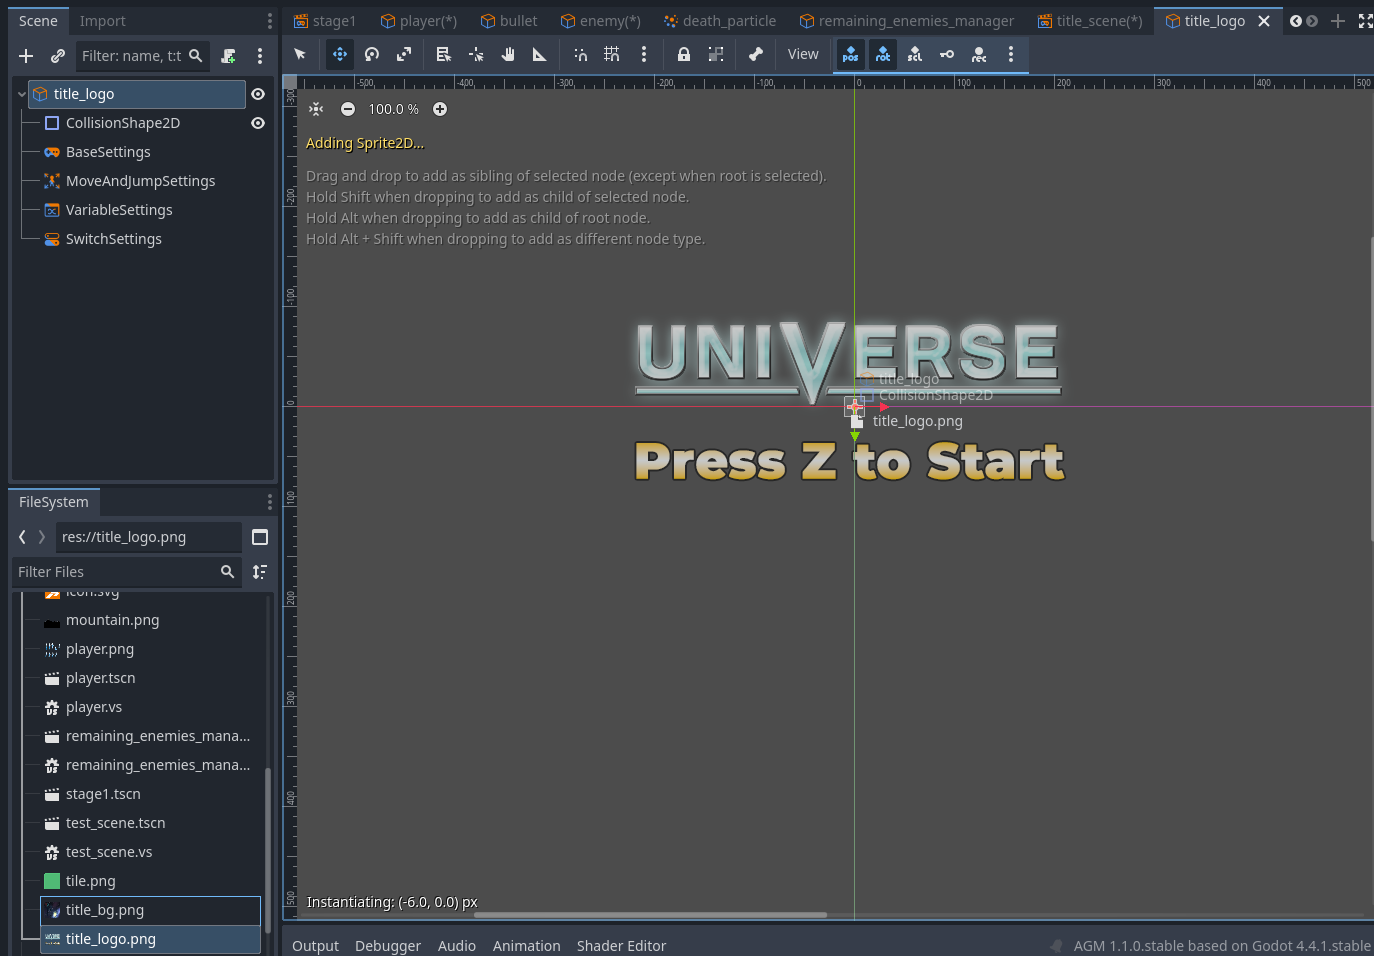
未保存を右クリックして、シーンを title_logo.tscn として保存します。
-
以下の画像を右クリックして、PC に保存します。
-
title_logo.png を ファイルシステム にドラッグしてインポートします。
-
title_logo.png をファイルシステムからエディタにドラッグして、シーンに配置します。
タイトルロゴゲームオブジェクトにビジュアルスクリプトを追加する
このオブジェクトはBGM オーディオを再生するだけなので、1 つの状態と 1 つのアクションだけで十分です。
-
title_logo (GameObject) ノードを選択し、 + (スクリプトの添付) をクリックします。
-
デフォルトの名前を変更せず、作成をクリックします。
-
State001 を Title にリネームし、+ 実行可能アクションの追加 をクリックします。
-
オーディオの再生を選択します。
-
オーディオデータで bgm_title (bgm_title.ogg) を選択し、追加をクリックします。
title_logo をタイトルシーン(title_scene)に配置する
-
title_scene タブと 2D エディタに切り替えます。
-
UI レイヤー下の TitleBG ノードを選択します。
-
title_logo.tscn をファイルシステムからシーンにドラッグして配置します。
- 表示されない場合は、背景の背後にある可能性があります。シーンツリーで、
title_logo ノードがUI レイヤーの子であり、**TitleBG の下(手前)**にあることを確認してください。参考画像の通りです。
タイトル画面からステージ1へのシーン遷移を作成する
これで、タイトル画面からステージ1へのシーン遷移を設定する時が来ました。
シーン遷移エディタは、ビジュアルスクリプトエディタとほぼ同じように動作します。
手順は以下の通りです。
- title_scene.tscn をシーン遷移エディタに読み込みます。
- 初期シーンを title_scene.tscn に設定します。
- title_scene.tscn から stage1.tscn への遷移条件を定義します。
- 遷移エフェクトを設定します。
手順
-
エディタタブを 2D から SceneTransition に切り替えます。

-
エディタウィンドウ(ビジュアルスクリプトビューに似ています)で、title_scene.tscn をファイルシステムからワークスペースへドラッグ&ドロップします。
-
title_scene を右クリックし、メニューから Set Start Scene を選択します。
-
次に、リンクを追加します。title_scene を右クリックし、Add Link を選択して stage1 に接続します。
-
Inspector で switching conditions を展開します。
-
Trigger On Input を有効にします。
-
入力操作リストで + Add Input をクリックし、 を選択してから New Input Condition を選びます。
-
新しい入力条件を展開して、以下を設定します。
-
入力キー:Jump
-
入力条件:Moment Pressed
切り替え前のエフェクト
-
Before the Switch Effects セクションを展開します。
-
以下を設定します。
- 遷移タイプ:Slide_Up
- BGM 設定:Stop
- フェードアウト:On
- SE 再生:On
- SE:se_enemy_damage (se_enemy_damage.ogg)
この設定により、遷移が開始するとタイトル画面が上方向にスライドし、「敵がダメージを受けた」SE が再生され、BGM は徐々にフェードアウトして停止します。
切り替え後のエフェクト
-
After the Switch Effects セクションを展開します。
-
遷移タイプを Slide Down に設定します。
これにより、タイトル画面が上方向にスライドする際、ステージ1 が下方向にスライドして表示されます。
シーン遷移をテストする
テストプレイを実行します。すべて正しく設定されていれば、ゲームはタイトル画面で開始し、Z キーを押すと遷移エフェクトがトリガーされ、ステージ1 に切り替わります。
トラブルシューティングチェックリスト
ゲームをエクスポートしよう
これでゲームは完成です。
これまでのところ、テストプレイはACTION GAME MAKERを通じてのみ可能であり、ACTION GAME MAKERがインストールされている人だけが実行できます。
しかし、エクスポート機能を使用することで、ゲームを単独でプレイ可能な状態にできるため、誰でもプレイできるようになります。
今回はWindows PC向けにエクスポートしてみましょう。
ゲームのエクスポート
-
プロジェクトメニューからエクスポートを選択します。
-
エクスポートウィンドウが開きます。追加ボタンをクリックし、Windows Desktopを選択します。
(この例では6つのエクスポートターゲットが表示されていますが、バージョン1.1.0時点では、ACTION GAME MAKERはAndroid、Web、Windows Desktopのみを正式にサポートしています。)
-
まず、エクスポート先を指定します。デフォルトではビルドはres://の直下に作成され、プロジェクトアセットと混在してしまいます。別のフォルダを作成しましょう。
エクスポートパスフィールドの右側にある アイコンをクリックします。
-
プロジェクトフォルダ(ファイルシステムと同じ)が表示されます。右クリックして新しいフォルダを作成します。
注意:
エクスポート先をファイルシステム外に設定することも可能です。分かりやすさのため今回はプロジェクトフォルダ内に設定しますが、実際にはより便利な場所にエクスポートすることもあります。
-
新しいフォルダの名前をexportとし、OKをクリックします。
-
新しく作成したexportフォルダ内に、ファイルをtutorialとして保存します。
(これが実行ファイルの名前になります。)
-
エクスポート先が以下のようになっていることを確認します。
res://export/tutorial.exe
-
次に、オプションを設定します。エクスポートコンソールラッパーをいいえに設定します。
(これはデバッグコンソールウィンドウを表示するかどうかを決定します。)
-
プロジェクトのエクスポートボタンをクリックします。
-
保存ウィンドウが表示され、先ほど設定したフォルダと実行ファイル名が表示されます。そのまま保存を押します。
-
「パッキング中…」という進行状況バーが表示されます。処理が完了するまで少し待ちます。
-
完了後、以下の警告が表示されることがあります。
これは、実行ファイルのアイコンや作者名などのメタデータを設定するツールrceditの実行に失敗したことを意味します。これらの設定は行っていないため、この警告は無視して構いません。
出力ログにも同様のエラー(ERROR: Could not create child process: rcedit export/tutorial.exe --set-icon…)が表示されることがありますが、これも無視して構いません。
エクスポートしたゲームのテスト
-
エクスポートウィンドウを閉じます。
-
ファイルシステムでexportフォルダを右クリックし、ファイルマネージャーで開くを選択します。
-
Windowsエクスプローラーが開きます。tutorial.exeとtutorial.pckの2つのファイルが表示されているはずです。
tutorial.exeは実行ファイル(ゲームそのもの)です。tutorial.pckには必要なアセットが含まれています。
-
tutorial.exeをダブルクリックして起動します。
タイトルが**Tutorial (DEBUG)**のウィンドウが表示され、ゲームをプレイできるようになります。
これで、ACTION GAME MAKERがなくても、あらゆるWindows PCでゲームをプレイできるようになりました。
ゲームを共有したい場合は、tutorial.exeとtutorial.pckを一緒に配布するだけです。
結論
おめでとうございます!あなたはもうゲームクリエイターです!
小さなゲームかもしれませんが、プロジェクトを最初から最後まで無事に完了させました。
おめでとうございます! 
もちろん、さらに追加したい要素もあるでしょう:
- ダブルジャンプ
- ウォールキック
- スライディング
- チャージショット
- 武器の切り替え
- ボス戦…
このゲームの中だけでも、試せるアイデアは無数にあります。もしかしたら、すでに全く異なるジャンルのゲームを作りたいと考えているかもしれません。
ここからは、あなたが作りたいものを作っていく番です!
時には難しいと感じることもあるでしょうが、このチュートリアルを通じてゲーム開発の基礎とACTION GAME MAKERの核心となる概念を学びました。今得た知識と少しの想像力で、あらゆる種類のゲームを作ることができます。
「このアクションとこの条件を組み合わせれば、うまくいくかもしれない…」と考えることができる限り、あなたは正しい道を進んでいます。
もし行き詰まったりアイデアが尽きたりした場合は、RPG Maker Guildを検索するか、公式のDiscordコミュニティで質問してみてください。
RPG Maker Guildの右上にある検索バーを使って、トピックを検索できます。
コミュニティサポート用の公式Discordチャンネル:
 https://discord.gg/vfaV86vYd9